“`html
Why Sole Flatness Fails Without Warning
Hand plane sole flatness has gotten complicated with all the myths and misconceptions flying around. I’ve owned planes that looked pristine in the bench vise but produced terrible results the moment I put them to wood — and I mean immediately terrible. The problem isn’t always visible. It happens gradually through wood movement, accidental drops, and the wear patterns that develop after hundreds of hours of use.
A plane’s sole loses flatness in predictable places. The toe and heel bear the most direct impact from being set down hard or dropped. The middle section wears where your hands grip during the push stroke. Temperature and humidity changes make the sole cup slightly, especially on older wooden planes. Then what? Uneven shavings. Tear-out on grain reversals. Fighting resistance that shouldn’t exist. You’re fighting the tool, not the wood.
The Straight Edge and Light Method
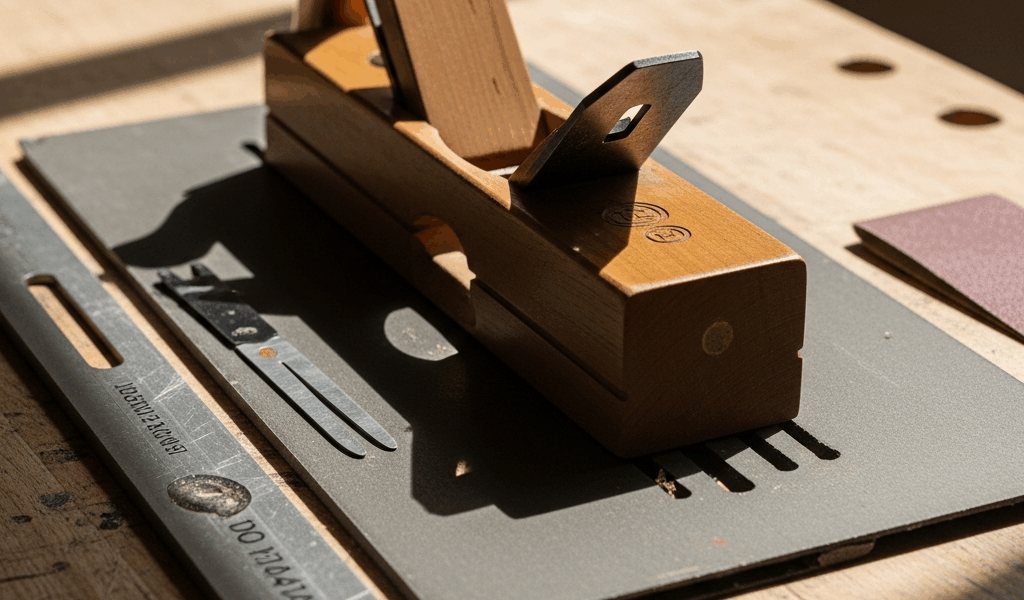
Frustrated by a Stanley #5 that wouldn’t perform, I grabbed a known-straight reference — a machinist’s rule I’d had for years — and held it against my sole under a bright lamp. This tells you everything without spending money on specialized equipment.
Here’s the process. Lay your plane on its side on a clean, flat surface. Take a straightedge — a machinist’s rule, a table saw fence, or a jointer bed — and position it across the sole at three points: the toe (front), the middle, and the heel (back). Hold it in place and look for light gaps underneath. Your eyes are the measuring instrument here. A gap you can slide a piece of paper through — roughly 0.003 inches — is visible. A gap you can barely see is smaller.
The toe and heel matter most. See light gaps at both ends while the middle touches? Your sole is convex — it rocks. This is the worst scenario. The plane will cut cleanly at the toe, lose contact in the middle, and catch again at the heel. Uneven, dangerous work.
Light only at the heel? Your sole is slightly concave. This is acceptable for most work. The front portion does the cutting; the heel just trails behind. Many production planes ship this way. Light only at the toe? That’s a serious problem you’ll notice immediately.
Position the straightedge along the length too — not just across the width. Run it from the toe to the heel in a straight line. This reveals lengthwise cupping, which happens on wooden planes exposed to humidity changes.
Probably should have opened with this section, honestly. Most woodworkers overthink plane checking. A straightedge and a lamp are all you need to identify problems. The method is so simple that people assume it’s inadequate. It isn’t.
Feeler Gauge Precision Check for Problem Areas
After the straightedge tells you where the problem is, feeler gauges let you measure it precisely without buying precision equipment. A basic feeler gauge set costs $8 to $15 at Harbor Freight — much less than specialized plane-checking straightedges.
Once you know where light gaps exist, slip feeler gauge blades under the straightedge at the suspect locations. You’re looking for the thickest blade that fits under the gap. That thickness is your gap measurement.
The tolerances that matter: anything under 0.005 inches (0.13 millimeters) is negligible for hand planes. This gap won’t affect performance on most work. Between 0.005 and 0.010 inches, you’re in the “notice it” zone — your plane might chatter slightly on difficult grain, but panel work stays fine. Over 0.010 inches at the toe or heel, you have a genuine flatness problem that will cause issues.
Measure at three points along the width and three points along the length if you’re being thorough. Most people find the problem in one or two locations. A worn heel might read 0.008 inches at the back corner but nothing elsewhere. A dented toe might show 0.012 inches in the center.
This method beats visual inspection for one reason: numbers force honesty. You either have a gap or you don’t. You either accept it or you don’t. No guessing involved.
Quick Sole Flatness Triage Using Sandpaper Grid
The sandpaper method is my favorite for fast triage. Lay a piece of 120-grit sandpaper on a flat surface — your jointer bed, table saw top, or any flat reference. Place your plane sole down on the sandpaper and push it forward and backward with moderate pressure for 30 seconds. The contact pattern shows instantly.
A perfectly flat sole creates even black contact marks across the entire sole surface. Uniform pattern means flat. High spots show heavy black marks. Low spots show no marks at all.
A rocking sole — convex — creates marks only at the toe and heel with a clear gap in the middle. This pattern is unmistakable once you’ve seen it. A sole that’s hollow marks the edges and barely touches the middle.
This method doesn’t give you numbers, but it gives you instant visual feedback about contact patterns. It’s faster than the straightedge method. It’s more informative than squinting at the sole in natural light. Probably the fastest way to decide if you need to take action.
The downside: it’s destructive. You’re actually wearing the high spots slightly. Do it once to assess, not repeatedly. And clean the sandpaper dust afterward — 120-grit particles are aggressive enough to scratch a sole if you’re not careful.
When to Accept Wear vs. When to Flatten
Tolerance depends entirely on plane type and what you’re trying to accomplish. Jack planes tolerate flatness variance better than jointer planes. Jointer planes are less demanding than smoother planes.
A jack plane (#5) with 0.010 inches of heel wear? Ignore it. That plane is supposed to be aggressive. A small concave sole keeps the toe engaged. This is actually preferred for roughing work.
A jointer plane (#7) with 0.008 inches of toe wear? Still acceptable. The back half of the sole does the final registration. The front just initiates the cut. Wear there barely matters for straightening a board edge.
A smoother (#4 or #4.5) with 0.010 inches of rocking from toe to heel? Now you have a problem. A smoother needs sole flatness for the final surface. Even small convex soles cause uneven shaving thickness. You’ll see it in the finished surface — one edge thicker than the other, indicating the plane rocked during the stroke.
Panel work tolerates variance better than edge work. Surfacing a 12-inch-wide panel? A slightly convex sole is almost invisible. Shooting edges on a bookcase frame? A rocking sole will wreck your joinery.
I kept a #7 with 0.012 inches of heel wear for years because I only used it for initial straightening. The worn heel never touched wood anyway — the toe and middle did all the work. That same plane would be worthless for final smoothing. Don’t make my mistake.
Document what you find. Write it down. Take a photo if you’re serious. Three months later you’ll forget whether that #5 had rocking at the toe or heel. Next time you pull it out and the cuts aren’t right, you’ll need to remember what you learned.
These methods — straightedge and light, feeler gauges, and the sandpaper grid — cost almost nothing and reveal exactly what’s happening with your planes. You don’t need precision equipment. You need honest assessment. Then you can make informed decisions about which planes are adequate as-is and which ones need actual flattening work.
“`


Stay in the loop
Get the latest crafted wood creations updates delivered to your inbox.