Table Saw Fence Not Parallel to Blade — Start With Diagnosis, Not Adjustment
Table saw alignment has started getting harder to follow with all the conflicting advice flying around. Tighten this bolt. Shim that bracket. Replace the whole fence. I’ve heard it all — and I’ve tried most of it in the wrong order. As someone who spent an embarrassing two days chasing a fence problem that turned out to be somewhere else entirely, I got hands-on with diagnosing a table saw fence that won’t stay parallel. Today, I will share it all with you.
The real issue is mechanical, and it branches. Could be the rail shifted. Could be the fence head has a worn cam lock or a bent body. Could be the throat plate sitting proud of the table surface. Or — and I’ve personally seen this on contractor saws — the whole rail mounting system came sloppy from the factory with tolerance stacks nobody bothered to correct. You need to know which one is actually broken before you start turning wrenches. That’s what makes this problem endearing to us woodworkers: it looks simple and absolutely isn’t.
So, without further ado, let’s dive in.
How to Actually Measure the Problem First
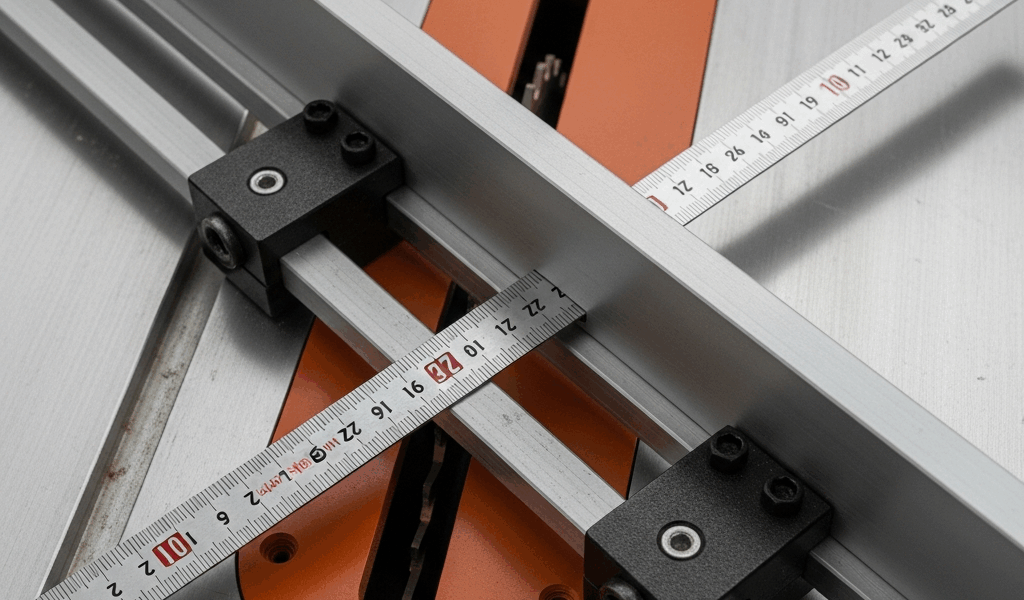
Grab a dial indicator. Not optional.
Clamp it to the miter slot so the plunger contacts the blade’s side. Lock the fence against the rail. Roll the indicator from front to rear of the blade and record both numbers. They should match within 0.015 inches — that’s the accepted production standard, and it’s tight enough for clean rip work.
No dial indicator? A Starrett combination square works if you’re careful about it. Not Harbor Freight. Place the blade of the square against a tooth at the front of the blade, aligned to the miter slot. Write down the gap. Rotate the blade so a fresh tooth sits at that same position, then check the rear. That step eliminates blade runout as a false positive. Important distinction.
Worth mentioning before anything else. I spent two full days shimming my Biesemeyer fence before I measured and found the blade was sitting 0.008 inches off at the front and 0.003 at the rear. That’s acceptable. My problem was somewhere else completely, and I’d have known that on day one with a $45 dial indicator from Shars.
Also — check front and rear at the same tooth height. Teeth vary. You’re measuring fence position relative to the rail here, not blade geometry. Keep those two things separate in your head.
Fence Rail Alignment Is the Most Common Culprit
The rail shifts. This just happens.
Vibration backs out bolts. Shop floors settle over winter. You roll the saw six inches to sweep and don’t retighten the mounting hardware. The rail drifts out of parallel with the miter slot — and when you lock the fence against it, the fence head follows. Your measurement reads off even though the fence head is sitting perfectly square to its own rail. Chasing the fence adjustment at that point accomplishes nothing.
Remove the fence completely to check the rail. Lay a straightedge along the top inner surface from front to rear and look for light underneath. Do the same along the bottom. A rail that’s twisted or sagging shows light in one direction but not the other. Takes about three minutes.
For a Biesemeyer-style T-square system — the vertical post sliding along a horizontal rail — the front and rear brackets bolt to the table wings or extension rails. Start there. Locate every bolt holding the rail. On a cabinet saw that’s typically four bolts per side, sometimes six. Check them all with a wrench. Hand-tight means nothing. They should resist a two-finger twist without budging.
If tightening doesn’t fix it, the rail itself might be bent. Older Biesemeyer rails develop kinks from dropped tools or bumps during transport. DeWalt and Makita contractor saw rails are aluminum and thinner — they bend easier. A minor kink you can sometimes address by loosening both brackets fully, sliding shim stock under one bracket, and re-tightening gradually. But a badly kinked rail is replacement territory. Don’t waste an afternoon on it.
Check that the mounting brackets haven’t shifted laterally. On older Craftsman and Jet models especially, the rear bracket slides sideways when bolts go in without lock washers. Use a combination square against the inner face of the front bracket, then the rear. They should read parallel. If the rear bracket has shifted — inward or outward — loosen its bolts, reposition it square to the table, reinstall with lock washers, and add a drop of blue Loctite on each thread. That’s medium-strength, not red. Red is permanent and you’ll regret it.
Adjusting the Fence Head and Lock Mechanism
Rail is straight and confirmed parallel to the miter slot? Good. Now move to the fence head.
A Biesemeyer-style fence slides a vertical body along the horizontal rail and clamps with a lock mechanism. Newer fences use a cam lock that pivots to apply pressure. Older ones use a lever and screw. Some have both — a primary cam lock plus micro-adjust screws on the sides of the head. Know which you’re working with before touching anything.
If your fence head has side-mounted micro-adjust screws, those are your tools now. Loosen the cam lock so the fence moves freely. Slide the fence against the blade, lock it hand-tight only. Dial indicator again. Off by 0.005 to 0.010 inches? The micro screws handle that. Turn the front screw clockwise to push the fence bottom away from the blade. Rear screw toes in the top. One quarter turn typically equals about 0.003 inches — go slow.
No micro screws on your fence? Shimming the rear rail bracket is the alternative. Loosen those bolts just enough to slip shim stock underneath — a feeler gauge or a strip of aluminum flashing both work. Slide shims until the dial indicator shows parallel, then tighten fully with threadlocker on every bolt.
Check the cam lock itself while you’re in here. A worn cam or cracked plastic glide underneath causes the fence to shift as you engage the lock — you set it perfectly, clamp down, and it moves. I’m apparently sensitive to this issue and my 2018 Biesemeyer clone does it while my old Delta fence never did. The plastic glide on a Biesemeyer usually lasts years, but I’ve seen saws where it’s so crushed that the fence actually rotates slightly on the lock stroke. New glide runs $60 to $90. Do it immediately if yours looks chewed up.
Contractor and Hybrid Saw Fences — Extra Complications
But what is a contractor saw fence, really? In essence, it’s a flat bar with a slide mechanism that was never designed to hold tight tolerances. But it’s much more than that — it’s a source of ongoing frustration because it was built to a price point, and the price point was low.
Before touching any adjustments, check the table itself. A hybrid saw with a cast iron top and a stamped steel extension wing can have a wing that’s dropped an eighth of an inch over time. Straightedge across both surfaces. If the wing is low, the rail mounted to it is low, and the fence will never sit parallel regardless of how much you adjust the head. Don’t do what I did of spending an hour on the fence when the wing was the problem the whole time.
The throat plate — that thin steel insert in front of the blade — is another one. If it sits proud of the table surface, it pushes the fence rail up slightly, corrupting your measurements. Lay a straightedge across the table and throat plate together. Should be flush or just barely recessed. Adjust the leveling screws underneath if yours has them, or carefully file the tabs if it doesn’t.
For contractor saws, full fence replacement is often the honest answer. A Vega or Unifence system runs $300 to $500, holds parallel within 0.003 inches, and keeps doing it for decades. I don’t say this to push anyone toward a purchase. I say it because a contractor saw with a stock fence that keeps drifting is just spending your labor on repairs that last three weeks.
When the Fix Doesn’t Hold — What to Check Next
You’ve adjusted everything. Fence sits parallel. Three cuts later, it’s drifted.
First thing to check is always the rail bolts — they backed out. Install every single one with a washer and blue Loctite on the threads. That alone solves most drift problems on newer saws. Takes twenty minutes. That was the entire fix on my brother-in-law’s Grizzly G0771Z last spring.
Second possibility is a bent fence body. Set the fence on a flat surface — cast iron saw top works — and look along its length from both ends. A body bent in torsion twists as you engage the cam lock, pulling one end in and one end out. No fix for that. Replacement only.
Third is a damaged fence face. Divots, chips, or a worn clamping surface means it won’t seat squarely against the rail no matter how perfect everything else is. Sandpaper doesn’t help. New fence head or a full replacement system.
A table saw fence not parallel to blade gets fixed the same way you fix anything mechanical: diagnosis before adjustment. Measure before you touch a bolt. Check the rail before you chase the fence head. And stop blaming the fence for problems the table itself is causing.


Stay in the loop
Get the latest crafted wood creations updates delivered to your inbox.