You just ran a profile cut on a piece of maple and the edges came out dark brown instead of clean. The wood burned, and now you’re sanding out scorch marks that shouldn’t be there. Router bits burn wood for six common reasons, and once you know which one is causing your problem, the fix is usually quick.
Why Router Bits Burn Wood
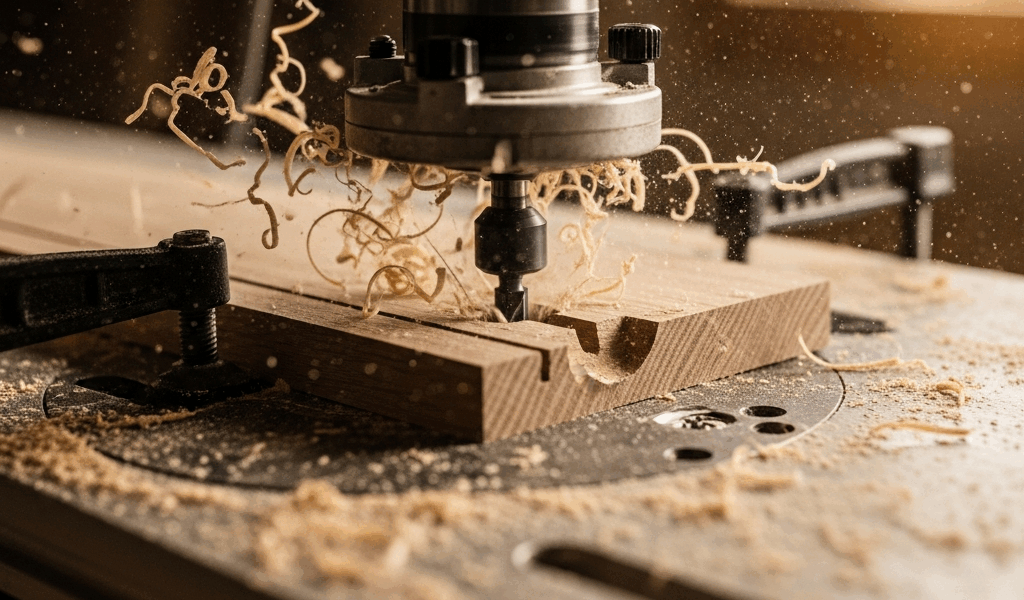
Burning happens when friction generates more heat than the cutting action can dissipate. Six variables control that friction: feed rate, RPM, bit sharpness, depth of cut, bit type, and fence alignment. Any one of them being off can cause burn marks — and on dense hardwoods like cherry and maple, you don’t get much margin before the wood starts scorching.
Cause 1 — Feed Rate Too Slow
The most common cause. When you push wood through the router too slowly, the spinning bit contacts the same spot for too long. Each tooth is rubbing rather than cutting, and that friction generates heat. Move faster. A consistent, deliberate feed rate that keeps the bit cutting fresh material with every revolution eliminates most burning problems instantly.
How fast is right? You should feel slight resistance but the wood should move steadily. If you’re white-knuckling the push and the wood barely moves, you’re too slow. Practice on scrap until the rhythm feels natural.
Cause 2 — RPM Too High for the Bit Diameter
Larger bits need lower RPM. A 1/4-inch roundover can run at 24,000 RPM all day. A 2-inch raised panel bit at 24,000 RPM is moving the outer edge at dangerous speed — and generating enormous friction. General guidelines: bits under 1 inch diameter can run at 22,000-24,000 RPM. Bits 1 to 2 inches: 16,000-18,000 RPM. Bits over 2 inches: 12,000-14,000 RPM.
If your router has variable speed, dial it down for larger bits. If it doesn’t have variable speed, avoid using bits over 1.5 inches in diameter — the fixed RPM is too high for them.
Cause 3 — Dull or Dirty Bit
A dull bit doesn’t cut — it scrapes. Scraping generates heat. Heat burns wood. If your bit is leaving burn marks on wood species that normally route cleanly, check the cutting edges. A sharp carbide edge reflects light at a fine line. A dull edge shows a visible flat or rounded surface when you look at it under good light.
Resin buildup on the bit face causes the same problem — the pitch and resin from wood (especially pine and cherry) coat the cutting edge and prevent it from clearing chips efficiently. Clean bits with blade and bit cleaner after every few uses. A $10 bottle of CMT Formula 2050 dissolves resin without damaging carbide. Soak the bit for 10 minutes, scrub with a brass brush, rinse, and dry.
Cause 4 — Too Deep a Pass
Taking a 3/8-inch roundover in a single pass on hard maple is asking for trouble. The bit removes too much material at once, the chip load overwhelms the flute’s ability to clear waste, and friction skyrockets. Take deep profiles in multiple passes — rough in the shape at half depth, then make a final pass at full depth. The finish pass removes a thin layer of material quickly and cleanly, leaving no burn marks.
Rule of thumb: never remove more than 1/8 inch of material per pass on hardwood. On softwood, you can push to 3/16 inch. On end grain, take even lighter passes.
Cause 5 — Wrong Bit for Wood Species
Cherry, maple, and other dense hardwoods are notorious for burning. They have tight grain that doesn’t clear chips easily and high natural resin content that gums up cutting edges. For burn-prone species, use bits with more flutes (three-flute bits clear chips faster than two-flute) and consider spiral upcut geometry for edge work — the upcut action pulls chips away from the cut surface more aggressively.
Softwoods rarely burn unless something else is seriously wrong. If pine is burning, you have a dull bit or a feed rate problem — species isn’t the issue.
Cause 6 — Router Table Fence Alignment
This one gets overlooked constantly. If the outfeed side of your router table fence isn’t aligned correctly with the bit’s cutting circle, the workpiece contacts the bit twice — once on the cut and once as it passes the trailing edge. That second contact is pure friction with no material removal, and it burns.
Check alignment: with the router off, rotate the bit by hand and mark the outermost point of the cutting edge. The outfeed fence face should be exactly tangent to that point. If it’s recessed behind the cutting circle, the wood springs back into the bit as it exits. A straightedge across both fence faces while referencing the bit’s cutting edge reveals the misalignment.
Quick Diagnostic — Match Symptom to Cause
Burns on the end of the cut (where you slowed down): Feed rate. Keep moving through the entire cut.
Burns everywhere regardless of feed rate: Dull bit, or RPM too high for the bit diameter.
Burns only on hardwood, softwood cuts fine: Take lighter passes, consider a three-flute bit.
Burns on straight cuts along the fence but not freehand: Fence alignment. Check outfeed fence position.
Burn marks plus rough surface: Bit is dull. Cleaning won’t fix it — time for a new bit or a sharpening service.


Stay in the loop
Get the latest crafted wood creations updates delivered to your inbox.