Random Orbit Sander vs Belt Sander — Which One to Grab
The Verdict Up Front
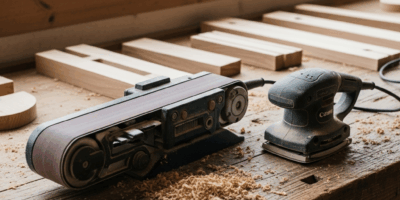
Picking between a random orbit sander and a belt sander has turned into a moving target with all the “just get both” advice flying around. Here’s the thing nobody says clearly enough: these tools don’t compete. They don’t even do the same job. The belt sander removes material. The orbital prepares surfaces. That’s it. That’s the whole argument.
Once that clicks, every shop decision gets simpler — belt sander when you’re moving stock fast, flattening a glued panel, or stripping old finish. Orbital when surface quality matters and you’re a couple grits away from laying down finish. So, without further ado, let’s dive in.
Where the Belt Sander Is the Only Sensible Choice
Flattening a Glued-Up Panel
Picture this: you’ve just pulled the clamps off an eight-square-foot walnut tabletop. Glue joints sitting proud in three spots, light cupping across two boards, and no wide drum sander in sight. That’s a belt sander job. Full stop.
Running an orbital across that surface at 80-grit will eat 45 minutes before you see meaningful progress. The random orbit pattern wasn’t designed for aggressive, directional stock removal across a wide uneven plane — you’ll load the disc, generate heat, and still have high spots mocking you. A belt sander with a fresh 60-grit belt run diagonally, roughly 45 degrees to the grain, flattens that panel in under ten minutes. Follow it with an 80-grit pass parallel to grain to chase out the cross-grain scratches. Then an 80 or 100-grit cleanup pass before handing off to the orbital. That’s the progression: 60 diagonal, 80 parallel, done.
Stripping Finish or Paint from Reclaimed Lumber
Reclaimed boards come in wearing decades of paint, varnish, or some mystery finish that laughs at chemical strippers. Spare yourself the wrong turn I took. I once tried stripping a set of old Douglas fir shelving boards — six of them, roughly 1x10s, picked up for $40 at a salvage yard — using an orbital loaded with 60-grit discs. An hour in, the finish was half-gone in the center of each board and completely untouched near the edges. Embarrassing doesn’t cover it.
A belt sander running a 60-grit aluminum oxide belt strips evenly across the whole surface. You can actually feel the tool working — progress is visible in real time, not something you squint at hoping for. Step up to 80, then 100 if you’re prepping for paint, and the board is ready.
Leveling a Tabletop After Assembly — One Board Sitting Proud
This one trips people up constantly. One board in a glued-up top is sitting 1/32 or 1/16 inch higher than its neighbors. The instinct is to grab whatever sander is closest. If that’s the orbital, you’ll regret it at finishing time — almost guaranteed.
An orbital running cross-grain to level a proud board leaves scratches that stay invisible until the first coat of oil or varnish hits the wood. Then they’re everywhere. A belt sander run perpendicular or diagonal to the grain brings the high spot down quickly and cleanly. Use 80-grit to level, 100 to blend the transition, then hand the surface to the orbital for final prep starting at 120. That sequence works. Skipping the belt sander step doesn’t.
Where the Orbital Sander Earns Its Keep
Figured and Curly Wood — Tear-Out Is Not Optional
Curly maple, figured walnut, quilted maple — grain in these boards reverses constantly. A belt sander running in a single direction will tear out against that grain somewhere on almost every pass. The random orbit pattern of a 5-inch orbital doesn’t eliminate that risk entirely, but it cuts it down significantly. The disc is never moving one consistent direction long enough to catch a reversal and rip it out.
For final prep on figured material, I run 120, then 150, then 180 with the orbital. The random orbit pattern at those grits leaves a surface that takes finish evenly without raising grain aggressively. Worth the patience. That’s what makes the orbital endearing to us furniture builders who’d rather not sand the same board three extra times.
Curved Surfaces and Detailed Work
Belt sanders require a flat reference surface — or they tip. Put one on a chair leg, a curved apron, or a routed cabinet door profile, and the tool will dig into any edge that catches the belt’s leading corner. You’ll round over profiles and create low spots that stay invisible until the finish goes on.
An orbital on a curved surface follows the contour without that aggressive edge tendency. For chair legs, I’ll wrap a foam-backed sanding pad around curved sections and finish with a 220-grit disc on the orbital for the flat sections. The belt sander never touches that work. Not once.
Sanding Between Finish Coats
An orbital at 220-grit between finish coats is precise, predictable, and light. You’re knocking down dust nibs and raised grain — not removing material. A quality 5-inch random orbit sander gives you real feel and control at this stage. I’m apparently hard on sanders, and I’ve run a Ridgid R2611 for years — around $60 at most home centers — while a Bosch ROS20VSC I tried never quite gave me the same feedback. Recently moved to a Mirka DEROS, which runs around $350 and is genuinely worth it if you’re doing this daily.
The random orbit pattern means you’re not chasing swirl marks into a cured finish coat. A belt sander at 220-grit on a finished surface is essentially a tool waiting for the exact wrong moment to dwell one second too long in one spot. Don’t do it.
The Job That Destroys the Wrong Tool
Frustrated by a slight bow in a veneered plywood panel early in my shop career, I ran a belt sander across it trying to flatten the thing out. Sanded through the veneer in two passes. The veneer on most sheet goods runs about 1/42 inch thick — there is simply no margin for a belt sander. That panel went straight to the scrap bin. That was 2009. I haven’t touched a belt sander to veneer since.
The opposite mistake happens just as often. Woodworkers trying to remove 1/16 inch of material with an orbital at 80-grit will burn through a box of discs and still not be there. Orbital sanders aren’t built for that kind of removal. They’ll get hot, the abrasive will load, and the stock still won’t be flat.
Frame-and-panel doors deserve a specific warning. A belt sander will round over the frame edges and flatten the raised panel profile in one careless pass. Happened in my shop on a set of cherry cabinet doors I’d spent two weekends building. The orbital is the correct tool for frame-and-panel work from start to finish — work the flat fields with the orbital, use folded sandpaper by hand on the profile transitions, and leave the belt sander on the shelf where it belongs for that job.
If You Can Only Own One
Quick callout up front — if you’re here because you’re deciding what to buy first, here’s the answer.
Buy the orbital. It’s not close.
A good 5-inch random orbit sander handles 80 percent of finish prep in a furniture or cabinetry shop. Flat panels, curved surfaces, detailed work, between-coat sanding — it does all of it without requiring much technique to avoid gouging something. The Ridgid R2611 runs around $60 and performs well for most woodworking. Step up to the Mirka DEROS or a Festool ETS 125 if you’re doing this daily — the vacuum integration and reduced vibration aren’t marketing language. They make a real difference over a long session.
The belt sander earns its place in a shop doing high-volume panel work, furniture restoration, or regular rough lumber prep. But it’s a specialist. Worth owning eventually — just not the daily driver for most woodworkers building furniture or doing finish work. Orbital first. Belt sander when the work demands it.

Stay in the loop
Get the latest crafted wood creations updates delivered to your inbox.