Why Snipe Happens on a Jointer
Jointer snipe has become tricky with all the conflicting advice flying around. And here’s the thing nobody tells you upfront: snipe isn’t one problem with one fix. It’s at least two completely different mechanical failures wearing the same name. I learned this the hard way — two full years chasing phantom adjustments on my 1978 Delta 8-inch, convinced the machine was defective. It wasn’t. I just didn’t know what I was actually looking at.
Today, I will share it all with you.
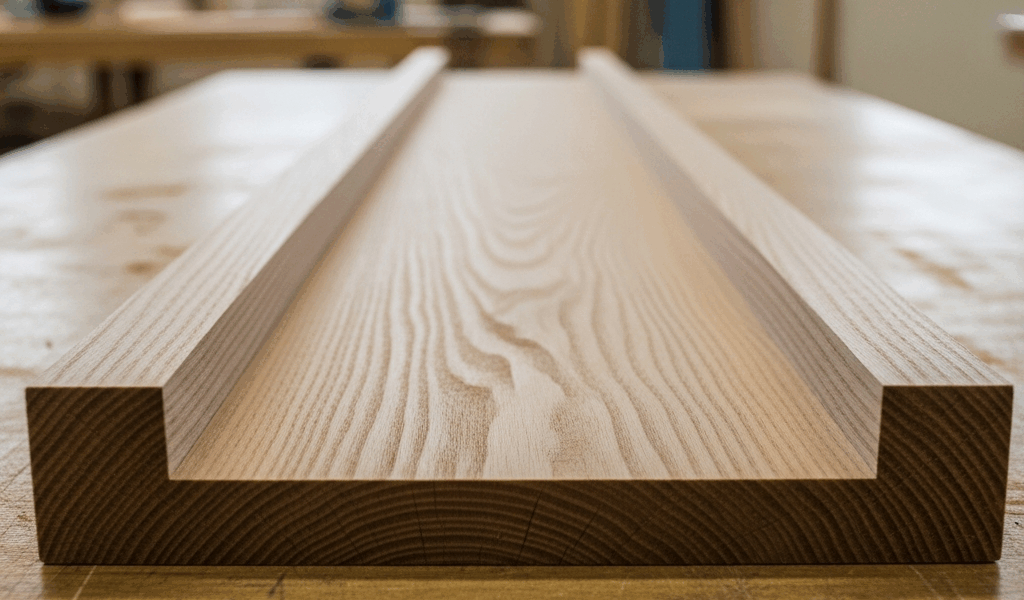
But what is jointer snipe? In essence, it’s an unwanted gouge or depression at the start or end of a board after jointing. But it’s much more than that. Snipe comes in two mechanically distinct forms, and mixing them up is exactly why most woodworkers spend months adjusting the wrong thing.
Form one: outfeed table height. When your outfeed table sits fractionally low — even 0.003 inches — the board drops as its trailing edge leaves the infeed table. The cutterhead hasn’t finished its pass yet. The knives catch that trailing corner and dig downward. You get a sharp depression roughly 2 to 4 inches from the board’s end. That’s outfeed-side snipe. It shows up at the tail.
Form two: infeed table misalignment. When the infeed table isn’t coplanar with the outfeed, or when it carries a slight twist, the board enters the cutterhead at an inconsistent angle. The leading edge digs deeper than intended for those first few inches of travel. Then the board rights itself as more length contacts the tables. Depression at the front. Different animal entirely.
Both can happen on the same machine simultaneously. Both require different diagnostic steps. That’s what makes this problem so maddening for woodworkers who just want flat edges.
Check Outfeed Table Height First
Quick note before the rest of this — outfeed height is where roughly 80 percent of snipe problems actually live.
While you won’t need a metrology lab, you will need a handful of reliable measuring tools. First, you should get a quality straightedge — at least if you want a diagnosis you can trust. Not the warped aluminum one that’s been leaning against your shop wall since 2009. A Starrett 24-inch precision straightedge runs $55 to $80 new. A vintage Disston works just as well if it’s still true. Either way, spend the money. A bad straightedge gives you bad information and you’ll chase ghosts for another two years. Don’t do what I did.
Place the straightedge across the cutterhead and the outfeed table with one knife pointing straight up — that’s the apex of the cutterhead’s arc, the highest point the rotating knives reach. The straightedge should bridge that knife’s cutting edge and the outfeed table surface simultaneously, lying perfectly flat across both. No light underneath. No rocking. The acceptable tolerance is 0.001 to 0.002 inches. That’s roughly the thickness of one sheet of standard copy paper. Light passing underneath means the table is too low. Straightedge rocking on the cutterhead means it’s too high.
Raise the outfeed table incrementally when it’s low. Use shims if your machine lacks fine adjustment — feeler gauges work beautifully here. A standard feeler gauge set costs around $8 at any auto parts store and lets you dial in height with real precision. Check repeatedly with the straightedge between each adjustment. This single fix, done correctly, resolves the majority of snipe complaints on jointers of every age.
Infeed Table Parallelism and Coplanarity
Once the outfeed height is dialed in, shift focus to the infeed table. This is the misalignment nobody wants to measure — but everybody eventually needs to.
Cast iron infeed tables develop twist over decades of use. The surface warps slightly, or the table was bolted at a fractional angle from the factory and nobody noticed for thirty years. Either way, the board doesn’t sit flat as it enters the cutterhead. The leading edge angles downward. The knives catch it harder than they should for those first few inches of travel, then the board levels out. Front-end snipe, every time.
Winding sticks diagnose this quickly. Two parallel wooden rails — typically 24 to 30 inches long, about 1.5 inches wide — placed across the surface in question. Place one set near the front of the infeed table, one set near the back. View them from the side at eye level. They should appear perfectly parallel. If the back set appears higher or lower than the front set, the table carries a twist. That inconsistency translates directly into inconsistent depth of cut as the board crosses the cutterhead.
Check coplanarity between infeed and outfeed tables as well. Lay your straightedge across both table surfaces with the cutterhead out of the way. The straightedge should contact both surfaces simultaneously, lying flat. Slip a 0.002-inch feeler gauge between the straightedge and either table — if it slides under, you’ve found a problem worth addressing before cutting another board.
Feed Rate and Board Handling Fixes
Even with perfect table geometry, technique produces snipe. I’m apparently heavy-handed at the tail end of a pass — a push stick with downward bias works for me while the free-hand finish never does. I’ve watched woodworkers with correctly calibrated machines still gouge trailing ends because they lifted the board through the last six inches. The instinct feels helpful. It isn’t.
Feed rate consistency matters more than feed rate speed. Push the board at a steady pace — no acceleration, no deceleration mid-pass. Most jointers perform cleanly somewhere around 20 to 30 feet per minute for hardwood. On an 8-inch jointer running at 4,600 RPM, the math works out to roughly a 2-inch advance per revolution. But honestly, your ears tell you more than any calculation. Listen for steady, even chatter from the knives. That’s the sound of a consistent cut.
Apply downward pressure on the outfeed table as the board’s trailing end approaches the cutterhead. Many woodworkers relax hand pressure once the board’s front half clears the cutterhead. Wrong move — keep firm downward pressure on the outfeed side until the back edge passes completely clear. This prevents the trailing end from lifting away from the table surface and dropping into the knives.
Never lift the board’s tail end to “guide” it through. The tables handle that. Lifting drops the trailing corner directly into the knife path.
When the Snipe Will Not Go Away
Sometimes snipe persists despite correct setup and clean technique. That’s wear talking.
Check the outfeed table gibs first — the sliding adjusters that lock the table at height. Loose gibs allow the table to shift fractionally during operation, dropping out of the adjustment you just spent an hour dialing in. Tighten them methodically, one at a time. If the table still drifts under pressure, the gib contact surfaces are worn smooth and cannot hold position. This happens reliably on machines past 30 or 40 years of hard use.
Worn cutterhead bearings introduce play that throws off every measurement you’ve taken. Spin the cutterhead by hand and feel for lateral movement — side to side, not rotational. A small amount of give is normal. More than 0.010 inches of side-to-side play means bearing replacement, not more calibration.
[X] might be the best option here, as full machine restoration requires access to bearing sets, gib strips, and sometimes light machine work. That is because worn bores and gib channels can’t be corrected with tightening alone — the surfaces need material or replacement. Budget $400 to $800 for a complete restoration on a vintage 8-inch jointer. Sounds steep. Compared to two years of frustration, it’s cheap.
A practical workaround exists for mild snipe when a full fix isn’t immediately possible: hand plane it away. A sharp No. 4 or No. 5 bench plane — a Lie-Nielsen No. 4 at $325, or an old Stanley No. 5 you tuned up for $35 at an estate sale — removes 0.005 to 0.010 inches of snipe in two or three passes. Not a permanent solution. But real woodworkers do exactly this when a deadline matters more than a perfect jointer setup. That’s not failure. That’s just the shop.


Stay in the loop
Get the latest crafted wood creations updates delivered to your inbox.