What the Cut Is Actually Telling You
Jointer outfeed alignment has gotten messy with all the conflicting advice flying around online. As someone who spent three months blaming dull knives for tapered boards, I spent months getting comfortable with outfeed height the hard way. Today, I’ll share it all with you.
But what is an outfeed height problem? In essence, it’s a misalignment between your knife arc and your table surface. But it’s much more than that — it’s the kind of thing that hides in plain sight and makes you question every other part of your setup first.
The symptom is unmistakable once you know what you’re looking at. A table sitting too low produces a board that tapers — thick at the infeed end, thin where it exits. The knives cut deeper as the stock crosses the cutterhead, and then the board drops slightly onto a surface that’s sitting below the knife arc. Taking six passes on a maple board at 1/16 inch each? The taper is obvious. Running one light pass at 0.015 inch? You’ll probably miss it entirely until you put a straightedge on it.
Too high is the opposite failure. The board lifts as it exits, bouncing up onto a table that’s positioned above the knife arc at top dead center. That gouges the trailing end — sometimes a sudden dip, sometimes a skip-mark pattern where the stock re-engages the cutterhead. I saw this on a 12-inch walnut board last year. Immediately assumed damaged knives. They were fine.
Material removal rate matters here more than most people realize. Hogging off 1/8 inch per pass makes misalignment obvious within two or three boards. Dropping down to 0.03 inch — what a lot of woodworkers do on final passes — can hide a 0.015 inch outfeed error for weeks. That’s what makes outfeed misalignment so endearing to us troubleshooters: it’s patient. It waits.
How to Actually Measure Outfeed Height
Quick note before the rest of this.
Measurement accuracy isn’t optional. I learned this by eyeballing my outfeed with the machine running and calling it close enough. It wasn’t close enough. It was off by 0.018 inch, which is nothing until it ruins a glue-up.
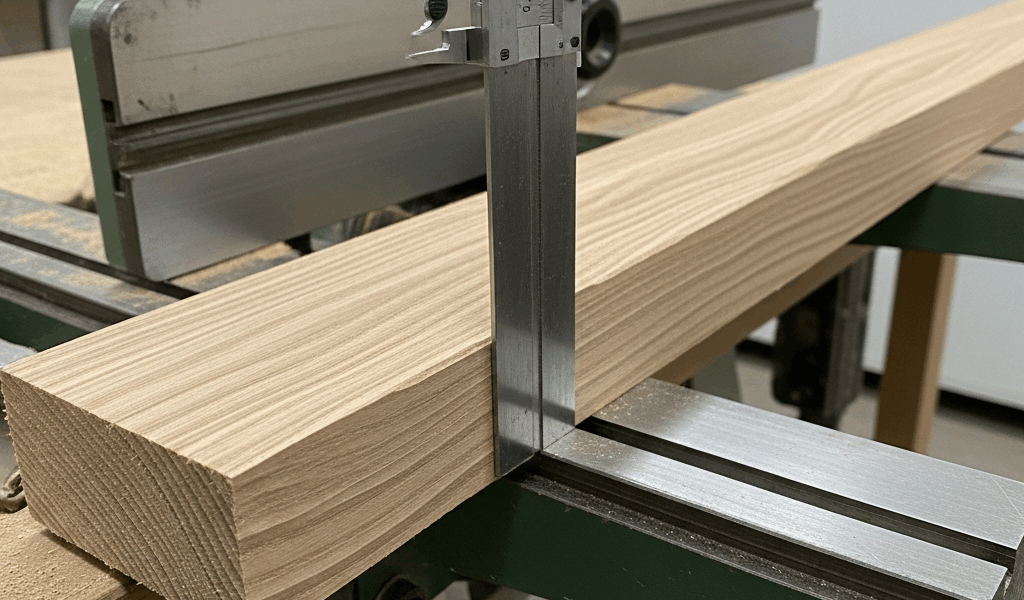
So, without further ado, let’s dive in. Unplug the jointer first — always. Rotate the cutterhead by hand until one knife reaches top dead center, the highest point of its arc. That’s your reference point. Lay a machinist’s straightedge flat across the top of the cutterhead and extend it out onto the outfeed table. The outfeed surface should sit flush with that straightedge, or no more than 0.003 inch below it. That’s roughly the thickness of a business card. Most machine tolerances live right in that range.
A dial indicator gives you real precision. Mount it on a rigid stand, zero it on the cutterhead at top dead center, then roll it across onto the outfeed table. Write down the reading — don’t just glance at it. Table sitting more than 0.005 inch below the knife arc? Too low. More than 0.003 inch above? Too high. I use this standard on my Powermatic 54A, and it translates well to most open-stand jointers.
One thing I want to flag before you start measuring: clean the knives and cutterhead first. Pitch and resin buildup will throw off your reading. I’m apparently a bad housekeeper about this, and my Powermatic suffers for it while my friend’s Delta never seems to collect the same gunk. Skip past the mistake I made — I once spent a full hour adjusting a table that was actually fine. I was measuring over accumulated buildup the whole time.
Cabinet-style machines and older Jet models sometimes have the outfeed table mounted differently. The straightedge method still works, but you may need to approach from above rather than the side. Check your manual. No manual? The manufacturer’s website or a PDF archive usually has it — I’ve pulled manuals for machines from the mid-1980s that way.
Adjusting the Outfeed Table — What Actually Moves
Knowing what physically moves the table saves you from chasing the wrong hardware for an hour. While you won’t need a full machinist’s toolkit, you will need a handful of specific things: a 6-inch machinist’s straightedge, a dial indicator with a magnetic base, and the correct wrench size for your machine’s locking screws. The Powermatic 54A uses 5/16-inch hex. The Jet JJ-8 uses a slightly different size — check before you start.
Open-stand jointers like those two use gib screws or cam-style adjusters at the rear of the outfeed table, one adjustment point per side. Loosen the locking screws slightly — just enough to allow movement — then turn the adjustment screws in small increments. A quarter turn at a time. One full revolution typically moves the table between 0.015 and 0.030 inch depending on the machine. The Jet uses cam adjusters that move faster but require more finesse. The Powermatic uses traditional gib screws that move more predictably. First, you should identify which system your jointer uses — at least if you want to avoid overshooting your target and starting over.
Cabinet machines, including some newer Jet models, have the outfeed table attached to a housing that sits on adjustable feet or a threaded rod system underneath. You access these from below. That means working blind or with a flashlight clenched in your teeth. Not fun. A flexible phone mount clipped to the cabinet helps — I use a $9 one from a gas station display rack, and it works surprisingly well.
Here’s the part that tripped me up for longer than I’d like to admit: over-tightening the locking hardware after adjustment. I’d dial in the height, lock it down hard, and then measure again to find the table had shifted by 0.010 inch. The tightening force itself was moving the table. Now I lock with firm, measured pressure — snug enough that it won’t drift under use, not so tight that the mechanism deflects under load. That distinction took me an embarrassingly long time to figure out.
Make a small adjustment. Measure. Make another adjustment. Measure again. Rushing this step doesn’t save time — it adds it. I know because I rushed it repeatedly before I stopped.
When the Outfeed Height Is Fine but Cuts Are Still Wrong
You’ve measured, adjusted, locked it down carefully, and the tapered cuts are still happening. This is where most people start spinning their wheels.
The culprit is almost always knife height inconsistency. If the three knives in your cutterhead don’t all sit at the same height relative to the cutterhead body, one or two will cut deeper than the others. That creates a rippled surface that reads as a taper if you’re not looking closely. It also produces chatter marks and uneven material removal across the board width — sometimes only on one side, which makes it even harder to diagnose.
Check knife height by rotating the cutterhead slowly by hand and watching the knife edge track through its arc. All three should follow the same path. If one sits 0.005 inch lower than the others, that’s your problem. Fixing it means reshimming or replacing the knife. Most jointers use shim plates behind the knife holders — removing one shim lowers the knife slightly, adding one raises it. Each shim runs between 0.003 and 0.010 inch thick, depending on the manufacturer.
Outfeed height and knife height are separate variables. That’s what makes this particular rabbit hole so frustrating for woodworkers trying to dial things in. You can have the outfeed table sitting at a perfect 0.002 inch below the knife arc and still get terrible results if the knives themselves aren’t matched in height. Fix one, then check the other.
Confirming the Fix With a Test Board
Once you’ve adjusted everything, measure again. Dial indicator on the cutterhead, straightedge confirmation, the whole sequence. Don’t skip it because you’re tired and pretty sure you got it right. Pretty sure isn’t the same as verified.
Pick a test board — hardwood, straight grain, roughly 8 inches long and 4 inches wide. Hard maple or red oak works well. Softwood gives you more feedback if there’s chatter, but hardwood shows surface quality more honestly. Run it through with a single light pass at around 1/32 inch, feeding at a steady pace. No speed changes. No pauses. Don’t lift it off early.
The board should exit smoothly — no lifting at the trailing end, no sudden drop as it clears the cutterhead. Check the jointed face with a straightedge. Then check it with winding sticks, which are just two parallel sticks placed on opposite ends of the board so you can sight down the surface for twist or concavity. A properly jointed board shows no twist and sits flat on a reference surface without rocking.
Run a second board. Then a third. Consistency is the real test here. If board one looks perfect and board two has a taper, the table probably shifted or wasn’t fully locked. Go back and re-measure — it’s not wasted time, it’s the actual job.
When all three test boards show a flat, evenly cut surface with no taper and no end-grain chatter, that’s it. That’s the fix. The jointer outfeed table too high or low problem is solved, and you’ll recognize it immediately next time — probably before you spend three months blaming your knives.

Stay in the loop
Get the latest crafted wood creations updates delivered to your inbox.