Gardening at ground level stops being fun around age 40. Knees don’t appreciate it. Backs revolt. And slugs treat your seedlings like an all-you-can-eat buffet. A raised planter box solves all three problems while adding serious visual appeal to any deck or patio. Built right with rot-resistant cedar, it’ll outlast most marriages.
Why Cedar Wins Every Time
Western red cedar contains natural oils called thujaplicins that make it genuinely hostile to rot, fungus, and insects. Unlike pressure-treated lumber, there’s nothing in cedar that you wouldn’t want near your vegetables. It’s stable, lightweight, works beautifully with hand tools, and weathers to that gorgeous silver-gray if you leave it natural.
For planter boxes, I use 1×6 rough-sawn cedar from a local mill. The rough texture looks better in a garden setting than smooth-planed boards, and the slight extra thickness adds rigidity. If you can only find surfaced lumber, standard 5/4 deck boards work well too.
Sizing That Makes Sense
Here’s the rule of thumb: make the box narrow enough that you can reach the center from either side. For most adults, that’s about 24″ wide. Length can be whatever fits your space – 4 feet is manageable for one person to move, 6 feet looks substantial, 8 feet becomes a statement piece.
Height is where you customize for your body. A comfortable working height without stooping is around 30″ to 32″ for most people. That means your box sides are probably 12″ tall, sitting on legs that bring the rim to waist level. For true accessibility, consider going higher – 36″ puts the soil surface at a height where you can garden from a wheelchair or stool.
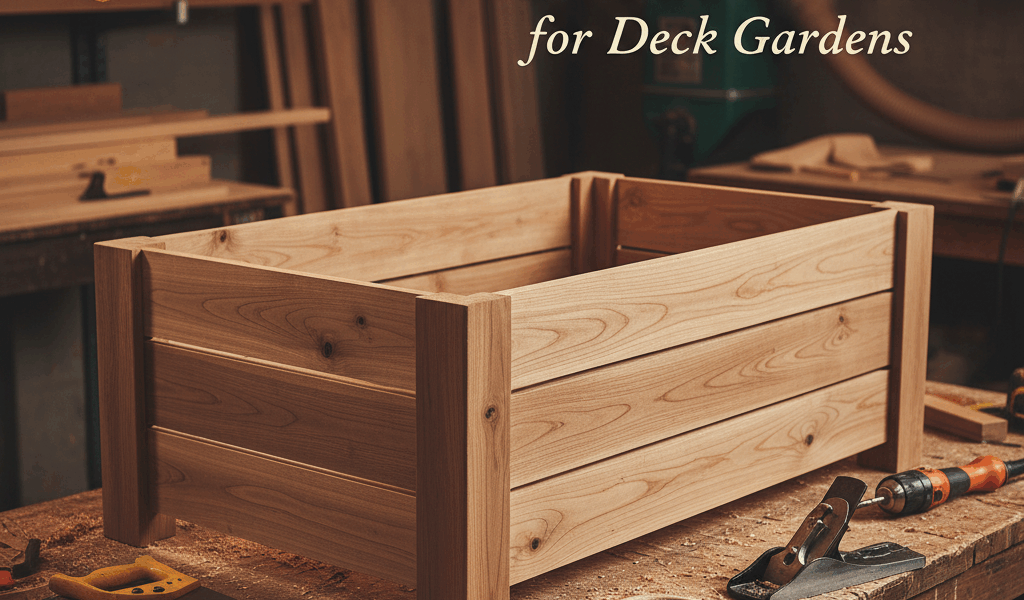
The Build: Corners That Last
Planter boxes fail at the corners. Wood expands when wet, contracts when dry, and eventually those butt joints start to open up. The solution is corner posts – 2×2 cedar posts at each inside corner that the side boards screw into. This gives you end grain meeting end grain at the corners, with the stress transferred to the posts instead of the joints.
Cut your corner posts to the full height of the box sides. Attach side boards to the posts using 2″ stainless steel screws – yes, stainless matters in this application. Standard screws will rust and stain the cedar. Predrill every hole to prevent splitting, especially near the ends of boards.
The Bottom: Drainage is Everything
A solid bottom traps water and accelerates rot. A completely open bottom lets soil spill out. The sweet spot is 1×4 slats spaced about 1/2″ apart, running the short dimension of the box. Line the inside with landscape fabric before adding soil – this holds the dirt in while letting water flow freely.
For the legs, 4×4 cedar posts look proportional on larger boxes. Cut them to whatever height brings your box rim to the working height you want, minus the thickness of the bottom slats. Attach legs to the inside corners with lag bolts or heavy-duty construction screws.
Soil Depth and What to Plant
With 12″ tall sides, you’ve got about 10″ of usable soil depth after the bottom slats and fabric. That’s enough for most vegetables, herbs, and annual flowers. Root vegetables like carrots want the full depth. Lettuce and herbs can get by with 6″ to 8″. Tomatoes and peppers thrive in this setup with proper staking.
Fill with a quality potting mix, not garden soil. Native dirt compacts in containers and drains poorly. A 50/50 mix of potting soil and compost is my go-to formula.
Finishing Touches
Cedar doesn’t need finish to survive outdoors – it’ll last 15 to 20 years untreated in most climates. But if you prefer the fresh-cut amber color over weathered gray, an annual coat of cedar-specific exterior oil maintains the original appearance. Avoid film-forming finishes like polyurethane on outdoor projects; they peel and look terrible within a year or two.
Add a flat cap piece around the rim if you want a place to set tools or rest a drink while gardening. A 1×4 or 1×6 laid flat across the top edge creates a useful ledge and dresses up the whole piece.
Total build time runs about 4 to 5 hours for a 4×2 foot box at standing height. Materials cost around $80 to $120 depending on cedar prices in your area. That’s less than any comparable commercial planter, and yours will look better and last longer.


Stay in the loop
Get the latest crafted wood creations updates delivered to your inbox.