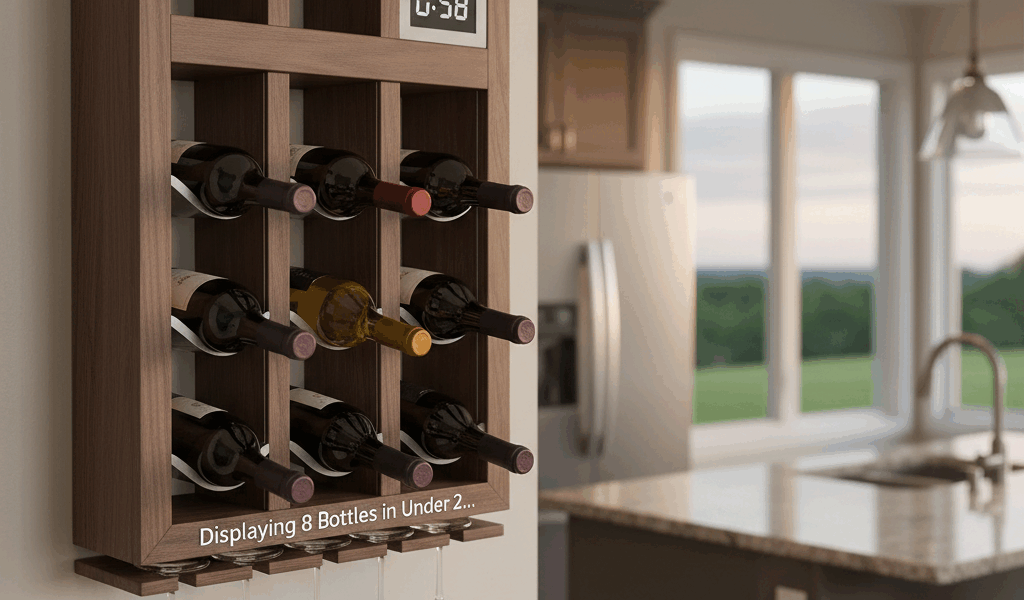
Wine storage is one of those problems that grows with you. One bottle turns into a case, a case turns into a collection, and suddenly you need somewhere to put it all. The wall-mounted rack is my answer when floor space is tight but wall space is available. Eight bottles displayed elegantly, assembled in under two hours, and solid enough to trust with the good stuff.
Design Approach: Horizontal Storage
Wine bottles need to lie horizontal to keep corks moist. A wall-mounted rack that stores bottles at an angle – neck down – achieves this while displaying labels beautifully. Each bottle nestles in a cradle formed by two horizontal rails, visible from any angle in the room.
This design uses two vertical supports with four pairs of rails between them. Each pair of rails holds two bottles side by side – eight bottles total in a compact footprint.
Dimensions
Standard wine bottles are about 3″ in diameter and 12″ long. The rails need to space about 3.5″ apart (measured edge to edge) to cradle a bottle securely. The vertical supports should be long enough to provide about 4″ of vertical spacing between bottle rows – this gives clearance for extraction and allows labels to show.
Working dimensions: vertical supports are 24″ tall x 4″ wide x 3/4″ thick. Rails are 16″ long x 1.5″ wide x 3/4″ thick. These proportions create a rack about 24″ tall x 16″ wide that projects 4″ from the wall.
Wood Selection
The rack is visible, so aesthetics matter. Walnut looks stunning against light walls. White oak works beautifully in contemporary spaces. Pine can work for rustic settings but may dent over time from bottle weight.
Avoid extremely hard or dense woods that make screw assembly difficult. Medium-hardness species offer the best balance of workability and durability.
Cutting the Rails
The rails are simple rectangles with a gentle concave curve on the top edge – this curve cradles the bottle and prevents rolling. Mark a curve that dips about 1/4″ at the center and rises to the full height at each end. Cut on the bandsaw, then smooth with a spindle sander or wrapped sandpaper.
All eight rails should match as closely as possible. Cut them all to length at the same time, mark the curves using a template, and sand them simultaneously.
Dadoes in the Verticals
Each vertical support receives four pairs of dadoes – slots where the rails will sit. Space them evenly down the length of the support, with the first pair about 2″ from the top and the last pair about 2″ from the bottom.
Each dado is 3/4″ wide (to match rail thickness) and about 3/8″ deep. The two dadoes in each pair are spaced 3.5″ apart, edge to edge. Cut these on the table saw with a dado stack, or make multiple passes with a regular blade.
Mark and cut both vertical supports at the same time – stack them and run them through together to guarantee alignment.
Assembly
Dry-fit everything first. Rails should slide into the dadoes snugly. The assembled rack should sit flat against a wall with all rails level.
Glue each rail into its dado and clamp the assembly. Reinforcing screws from the back of the verticals into the rail ends add mechanical strength – use 1-1/4″ screws and predrill carefully to avoid splitting.
Let the glue cure fully before mounting.
Mounting to the Wall
Eight full wine bottles weigh about 25 pounds, so the mounting needs to handle that with a healthy margin. French cleats work well – a beveled strip on the wall engages a matching strip on the back of the rack. This spreads the load and allows easy removal for refinishing or moving.
Alternative: drive long screws through the vertical supports directly into wall studs. Use 3″ screws minimum and hit at least two studs. This is simpler but leaves visible screw heads (which can be plugged with matching wood).
Finishing Before Mounting
Complete all finishing before wall installation. Wine drips happen, so the finish should be at least somewhat water-resistant. Three coats of wipe-on polyurethane work well, or a penetrating oil followed by paste wax.
Pay attention to the curved surfaces where bottles rest – these need to be smooth to prevent label damage. Sand to 320 grit and apply finish carefully in these areas.
Loading Tips
Position heaviest bottles (usually reds in thick glass) in the lower rows. This keeps the center of gravity low and makes the whole installation more stable. Alternate bottle direction in each row – one bottle neck-left, the next neck-right – for visual balance.
Leave a bottle or two out so you can actually see the rack itself. A fully loaded rack disappears behind bottles; a few empty slots show off your work.
Time Investment
From rough lumber to wall-mounted rack runs about two hours of active work plus finish drying time. Material cost is $30 to $50 depending on wood species. The result is a permanent wine storage solution that looks custom-built – because it is.
For larger collections, the design scales easily. Add more rows of rails for more bottles, or build multiple racks to fill a larger wall section. The basic construction stays the same regardless of scale.