Why Hard Maple Tears Out More Than Other Species
Hard maple has gotten complicated with all the conflicting advice flying around. Feed it backward. Wet the surface. Buy a new planer. Most of it misses the actual problem — which is grain, not equipment.
As someone who has fed dozens of maple boards through a 15-inch Powermatic and watched beautiful slabs turn into firewood, I learned everything there is to know about why this species behaves the way it does. Today, I will share it all with you.
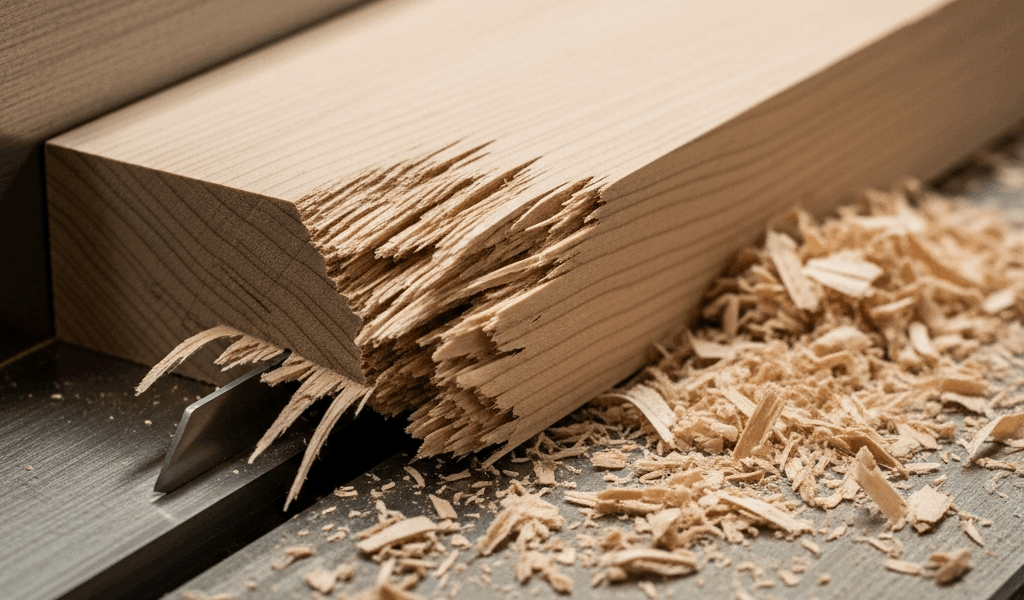
But what is interlocked grain, exactly? In essence, it’s wood fiber that twists and reverses direction across the width of a single board — sometimes within a few inches of itself. But it’s much more than that. It’s the reason standard planing logic completely falls apart on maple. You might feed a board perfectly for the first twelve inches, then hit a reversal that demolishes the surface before you hear it happening. Softer species compress under that kind of abuse. Maple just splits.
That’s what makes maple endearing to us woodworkers — the figure, the density, the way it takes a finish. But that same density means there’s no forgiveness built in. So, without further ado, let’s dive in.
Step 1 — Check Your Depth of Cut First
This is where most tear out actually lives. Probably should have opened with this section, honestly.
Most planers ship with a default depth setting around 1/8 inch. Fine for pine framing. Fine for poplar cabinet parts. Hard maple demands something closer to 1/32 inch on final passes — and yes, that’s as shallow as it sounds. At that depth, even a grain reversal produces minor slivering instead of a chunk missing from your surface.
The sound changes at the right depth. A properly dialed pass on hard maple sounds like a quiet hiss — almost a whisper. Go too deep and you get a stuttering, grating noise, like the machine is choking on something. That’s not a metaphor. That’s fibers breaking rather than shearing. Once you hear it, you don’t forget it.
Start rough passes at 1/16 inch. Drop to 1/32 inch for the last two or three passes. I’m apparently obsessive about depth-of-cut increments and this approach works for me while jumping straight to finish depth never does. Don’t make my mistake.
This is not slow woodworking. This is correct woodworking on a species that doesn’t negotiate.
Step 2 — Feed Direction Against the Grain
Reading grain direction on maple before feeding is non-negotiable. Stand at the end of the board. Look at the growth rings along the edge. Run your finger along the grain fibers — they point in a direction, like fur on an animal’s back.
Feed the board so the grain rises toward the planer head, not away from it. Stroke the fur from neck to tail. Tail to neck and everything stands up and tears. Same logic, same result.
Figured maple — curly, quilted, bird’s-eye — makes this harder because the grain reverses inside a single board. I learned this the expensive way on a curly maple slab I’d paid $180 for at Hearne Hardwoods. Ruined the surface on the first pass. After that, I started examining every board under a raking light before it touched the feed rollers. The visual cues are there. You just have to look for them.
Sometimes the reversals are severe enough that no single feed direction solves it. That’s not a problem to fix — that’s data. That board is telling you something about the strategy it needs. Acknowledge it before you start.
Flipping the board and planing from the opposite end is a legitimate tactic. Some woodworkers plane one half from each direction, meeting at the centerline. It requires stopping at exactly the right point and refeeding — messy in practice, but effective when grain reversals are bad enough to demand it.
Step 3 — Dull Blades Make Maple Tear Out Worse
Frustrated by persistent tear out even after adjusting feed direction and depth, most beginners blame the planer. Usually the blades are the problem — specifically, dull ones.
A dull blade in hard maple doesn’t just produce a rougher surface. It amplifies tear out across the entire board. Sharp blades shear fibers cleanly, even across grain reversals. Dull blades crush and tear regardless of feed direction or depth setting. Maple doesn’t compress under that pressure the way pine does. It splits.
Rotate blades every 5,000 to 8,000 board feet of hard maple. Don’t wait for visual inspection to confirm they’ve gone dull. By the time you can see it, damage is already happening to your stock.
There’s a diagnostic difference worth knowing here. Tear out from dull blades leaves a crumpled, fuzzy surface — almost looks like crushing. Tear out from grain direction leaves sharp, angled chunks missing from the surface. Fuzzy pattern means change the blades first, before you touch feed direction or depth settings.
A Byrd Shelix helical head with carbide inserts might be the best option, as hard maple requires a shearing cut rather than a straight chop. That is because individual carbide inserts contact the wood at a skewed angle, which dramatically reduces tear out on reversing grain. Expect to spend $400 to $600 depending on your planer’s size. Not mandatory — but if you’re running hard maple regularly, it pays for itself in boards you don’t have to sand back to flat or throw away.
When Tear Out Persists — Card Scraper and Hand Plane as the Real Solution
Severe grain reversals in hard maple will not fully respond to planer adjustments alone. That’s not failure. That’s just the nature of the species — and recognizing it is what separates experienced maple workers from beginners still fighting the machine.
A card scraper is the fastest cleanup tool in this situation. Set the edge at 90 degrees to the surface, apply light pressure, and pull it across the board. Hard maple actually rewards the scraper because the density produces a clean, almost glassy surface with zero fuzziness. You’re removing maybe two or three thousandths of an inch. That’s it.
A hand plane set to a 50-degree cutting angle works even better on figured maple. The steep angle means the blade slices fibers at a shallow angle relative to the grain — and steep-angle planes handle reversing grain in ways low-angle tools simply can’t. A Stanley No. 5 with a sharp blade set to a 50-degree attack angle will clean up planer tear out on hard maple faster than any sanding sequence you can put together. This new approach to finishing figured stock took off several years later among furniture makers and eventually evolved into the hybrid machine-and-hand workflow enthusiasts know and rely on today.
While you won’t need a full set of specialized planes, you will need a handful of sharp scrapers and at least one well-tuned bench plane. First, you should address the worst tear out with a scraper — at least if you want to avoid burning through sandpaper grits trying to level what’s essentially a small crater. The planer handles rough milling. The hand plane handles difficult grain. Use each tool where it actually works.


Stay in the loop
Get the latest crafted wood creations updates delivered to your inbox.