Sharpening hand tools intimidates beginners more than it should. The process is straightforward once you understand the fundamentals. This complete guide covers everything from basic concepts to advanced techniques for achieving razor edges.
Why Sharpening Matters
A sharp tool cuts cleaner, requires less effort, and gives you better control. The difference between sharp and dull isn’t subtle—it’s the difference between pleasant work and frustrating struggle.
Sharp tools are also safer. A dull chisel requires more force, increasing the chance of slips. When the edge finally bites, it may jump unpredictably. Sharp edges cut predictably under light pressure.
Learning to sharpen breaks the cycle of buying cheap tools that disappoint. Any decent tool, sharpened well, outperforms premium tools left dull. Invest in sharpening skills before investing in high-end steel.
Understanding the Edge
All cutting edges share common geometry. Understanding these elements helps you sharpen any tool effectively.
The Bevel Angle
The angle where the bevel meets the flat back determines edge strength versus cutting ability. Lower angles cut more easily but dull faster. Higher angles stay sharp longer but require more force.
Chisels typically use 25-30 degrees. Plane irons range from 25 degrees for softwoods to 30+ degrees for hardwoods. Carving tools may go as low as 15-20 degrees for delicate cuts.
The angle you choose depends on the work. A cabinet maker’s chisel needs to withstand paring pressure; a carver’s gouge does lighter work.
Primary and Secondary Bevels
Many woodworkers grind a primary bevel at one angle, then hone a secondary bevel at slightly higher angle. The primary bevel establishes overall geometry; the secondary creates the cutting edge.
Typical setup: primary at 25 degrees, secondary at 30 degrees. The small secondary bevel hones quickly while maintaining edge strength.
Some prefer a single bevel ground and honed at the same angle. This eliminates the step between bevels but requires removing more metal during sharpening.
Microbevel
A microbevel adds a tiny third bevel at an even higher angle. Just a few strokes at 32-35 degrees creates a microbevel that strengthens the very edge.
Microbevels help in figured hardwoods where edges chip easily. They’re quick to refresh, buying time between full sharpening sessions.
The Back
The flat back of chisels and plane irons matters as much as the bevel. Any curve or hollow on the back creates a rounded edge where bevel and back meet.
Flatten the back during initial tool preparation. This one-time process removes factory grinding marks and establishes a true reference surface. Maintain this flat throughout the tool’s life.
Sharpening Methods
Multiple methods achieve sharp edges. Each has advantages for different situations and preferences.
Oilstones
Traditional oilstones cut slowly but produce excellent edges. Natural Arkansas stones have been used for centuries. Synthetic India stones offer faster cutting at lower cost.
Oilstones use mineral oil or honing oil as lubricant. The oil floats metal particles and prevents loading. Stones require cleaning but rarely need flattening.
The slow cutting action makes oilstones forgiving. It’s hard to round an edge or create unwanted bevels when the stone removes metal gradually.
Start with a coarse India stone for establishing bevels, then move to fine Arkansas for final honing. The process takes longer than other methods but requires less equipment investment.
Waterstones
Japanese waterstones cut faster than oilstones and polish to higher finishes. They’re the preferred method for many serious woodworkers.
Waterstones use water as lubricant. The soft bond releases fresh abrasive constantly, maintaining cutting speed. This same softness means stones wear quickly and need frequent flattening.
Grits range from 220 for repair work through 10,000 or higher for mirror polishes. A practical kit includes 1000-grit for primary sharpening and 6000-grit for honing.
Soak porous stones for five minutes before use. Splash stones need only surface water. Keep a nagura stone or diamond plate handy for flattening.
The fast cutting requires attention to technique. It’s easy to round edges by rocking on the soft surface. Keep the tool flat and moving.
Diamond Plates
Diamond plates use industrial diamonds bonded to metal substrates. They cut fast, stay flat, and work with water or dry.
The plates never hollow out like conventional stones. This makes them ideal for flattening waterstones and establishing backs. Many woodworkers use diamonds for coarse work and stones for finishing.
Quality varies dramatically. Cheap diamond plates lose their coating quickly. Invest in reputable brands for plates that last.
Diamond grits don’t correlate exactly with stone grits. A fine diamond plate leaves a surface similar to a medium waterstone. Use stropping or finishing stones after diamond plates for the best edges.
Sandpaper
The Scary Sharp method uses automotive sandpaper on flat substrates. Glass, granite, or machine surfaces provide the flat reference.
Initial cost is minimal. Any flat surface you already own becomes a sharpening station. Replacement paper costs pennies per session.
Progress through grits: 220, 320, 400, 600, 800, 1000, 1500, 2000. The fine papers create excellent edges. Silicon carbide paper works wet or dry; aluminum oxide requires water.
The main drawback is waste. You’re constantly buying paper and disposing of used sheets. Over time, the cost approaches that of permanent stones.
For beginners, sandpaper offers risk-free learning. Mistakes waste a few cents of paper rather than damaging expensive stones.
Grinding
Bench grinders, belt sanders, and slow-speed grinders remove metal quickly for reshaping damaged edges. They’re not for final sharpening but speed the process dramatically.
High-speed grinders risk overheating the steel and destroying its temper. Keep water handy for cooling. The blade should never get too hot to touch.
Slow-speed grinders with 1800 RPM motors and friable wheels reduce heat buildup. CBN or diamond wheels on slow grinders give even better results.
Belt sharpeners offer excellent control and cool cutting. The flexible belt conforms to curved tools like gouges.
Powered Sharpeners
Systems like the Tormek combine slow-speed grinding with leather stropping. They produce consistent results with less skill than freehand methods.
The horizontal wheel runs through a water bath, eliminating heat concerns. Jigs position tools at precise angles. The leather wheel and stropping compound polish the edge.
Cost is the main barrier. Quality powered sharpeners rival the price of good tool sets. For professionals or production shops, the time savings justify the investment.
Technique Fundamentals
Proper technique produces sharp edges regardless of which sharpening media you choose.
Flat Back Work
Begin any new tool by flattening its back. Place the back flat on your coarsest surface and rub in circles or figure-eights. Work until the entire back near the edge shows an even polish.
You’re not removing material across the whole back, just establishing flatness near the cutting edge. A few inches of polished back suffices.
Progress through grits until the back shows a mirror polish near the edge. This foundation serves for the life of the tool.
During regular sharpening, a few strokes on your finest grit removes any burr and maintains the back.
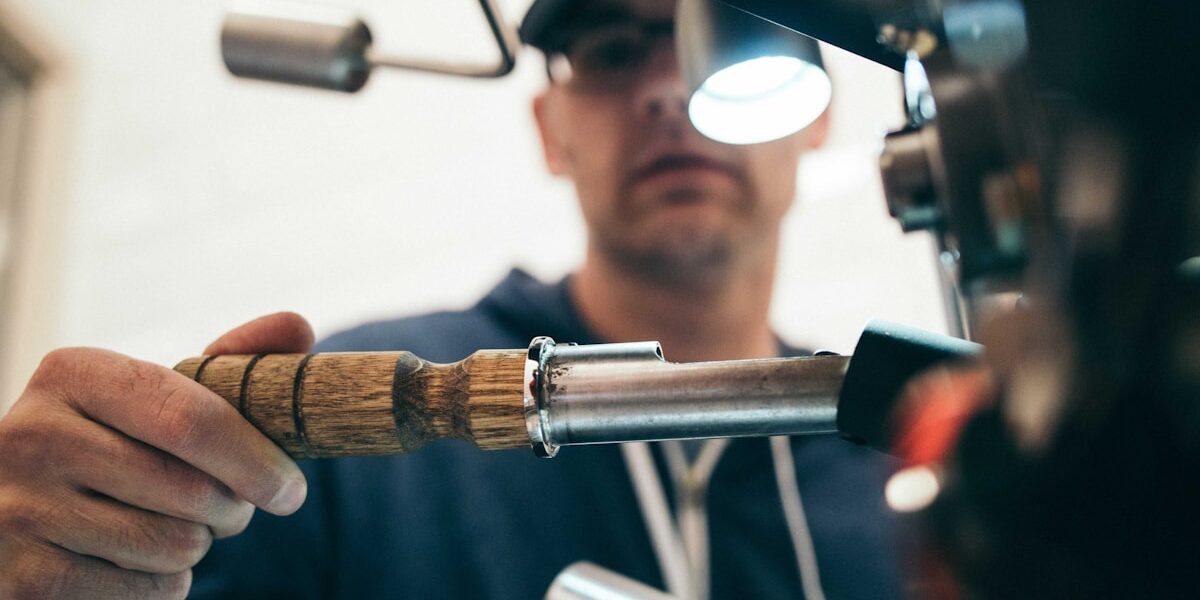
Bevel Sharpening
Place the bevel flat on the stone. You should feel it register—the whole bevel touching uniformly. If you’re creating a secondary bevel, raise the handle slightly until only the edge touches.
Move the tool across the stone with consistent pressure. Long strokes use more stone surface and prevent dishing. Keep the angle constant throughout the stroke.
Work until you feel a wire edge on the back. This burr forms when you’ve sharpened all the way to the edge. If no burr forms, you haven’t reached the edge yet.
The Burr
The wire edge or burr is crucial feedback. It tells you when to progress to finer grits and when you’ve finished.
Form a burr on your coarsest grit, then move to the next grit. Work the bevel until the burr flips to that grit’s finish, then move finer. Continue until your finest grit.
Remove the final burr by stropping or by alternating light strokes on back and bevel. The edge is ready when no burr remains and both surfaces polish cleanly.
Maintaining Angle
Consistent angle is the hardest skill to develop. Several approaches help beginners maintain position.
Honing guides hold tools at fixed angles. Simple guides roll on the stone; complex jigs offer multiple settings. Guides guarantee results while you develop muscle memory.
Sharpie marker on the bevel shows where you’re removing metal. If the ink removes unevenly, you’re rocking the angle. Adjust until the whole bevel polishes together.
Practice on cheap tools. Old chisels from garage sales let you experiment without risking good steel. Sharpen dozens of edges until the motion becomes automatic.
Sharpening Specific Tools
Different tools require adapted techniques while following the same fundamental principles.
Chisels
Chisels are the simplest tools to sharpen. The flat back and straight edge present no complications.
Most bench chisels work well at 25-30 degrees. Paring chisels for light work can go lower; mortise chisels for heavy chopping should stay at 30 degrees or above.
Square the edge if it has become skewed. Use a coarse grit and focus pressure on the high side until the edge is straight across.
Plane Irons
Bench plane irons sharpen like chisels with one addition: a slight curve or camber helps the blade work without leaving tracks.
For jack planes, apply more pressure at the corners during sharpening to create noticeable camber. The rounded corners won’t dig in during aggressive work.
Smoothing planes need less camber—just enough to feather the corners. Too much curve leaves visible scallops on finished surfaces.
Jointer planes need straight edges for flattening work. Sharpen with even pressure across the entire width.
Cap irons or chipbreakers need their leading edge polished smooth. Any gap between chipbreaker and iron allows chips to jam.
Scrapers
Card scrapers and scraper plane irons require burnishing after sharpening. The turned edge does the cutting, not the sharpened edge itself.
Start by filing the edge square and flat. Draw-file lengthwise to maintain straightness. Hone the edge on fine stones.
Polish both faces near the edge. Any roughness here transfers to the burnished edge.
Burnish the edge with a hard steel rod. First draw the burnisher flat along the faces to consolidate the edge. Then tilt slightly and draw along the edge to turn a hook.
Light pressure turns fine hooks for finishing. Heavy pressure creates aggressive hooks for heavy stock removal. Experiment to find what works for your applications.
Carving Tools
Gouges and V-tools present curves that stones can’t follow. Slip stones, shaped to fit inside curves, sharpen the concave surface.
The outside curve sharpens on flat stones with a rocking motion. Keep the bevel in contact as you roll the tool through its arc.
Maintain consistent angle through the roll. This takes practice—the tendency is to lift the handle as you rotate.
Strops loaded with compound reach into the curves for final polishing. Shaped leather or MDF pieces fit various sweep profiles.
Handsaws
Saw sharpening follows different principles than edge tools. Each tooth requires individual attention.
Jointing levels all teeth to the same height. A mill file run along the toothline removes high points. Joint only until you see a bright spot on every tooth.
Setting bends alternate teeth left and right. This creates clearance so the blade doesn’t bind. A saw set tool provides consistent bend.
Filing shapes each tooth to a point. File crosscut teeth at an angle (fleam); file rip teeth straight across. Match file to tooth size.
Saw sharpening rewards patience. The first few attempts may give poor results. Practice on garage sale saws until you develop skill.
Troubleshooting
When edges don’t perform as expected, systematic diagnosis finds the problem.
Edge Doesn’t Cut
If the tool won’t cut, you haven’t reached the edge. Continue sharpening until a burr forms across the entire width. No burr means metal still remains at the edge.
Check that you’re maintaining angle. Rising handle means you’re sharpening above the edge. Lower the handle until the bevel registers flat.
Edge Dulls Quickly
Edges that dull immediately may have lost their temper from grinding heat. Blue discoloration indicates overheating. Grind back past the damaged area and resharpen.
Very low angles create weak edges. If you’re using 20 degrees on hardwood, try 30 degrees for longer edge life.
Soft steel from poor tools won’t hold an edge. Consider upgrading or accepting frequent resharpening.
Chipping
Chipped edges indicate either too low an angle for the work or bad steel. Increase the angle five degrees and test again.
Large chips from new tools suggest manufacturing defects. Quality tools shouldn’t chip under normal use.
Uneven Edge
Skewed or curved edges result from uneven pressure while sharpening. Pay attention to pressure distribution across the blade width.
Use a honing guide until you develop consistent freehand technique. The guide guarantees even contact.
Maintenance Schedule
Regular maintenance keeps tools performing without emergency sharpening sessions.
Daily
Strop frequently used tools at the end of each session. A few passes on loaded leather maintains keen edges.
Wipe blades with light oil before storage. Moisture causes rust that pits cutting edges.
Weekly
Quick sharpening on fine stones refreshes edges before they dull noticeably. A few minutes prevents longer sharpening sessions.
Monthly
Inspect all edges for damage. Sharpen any tools showing wear. Flatten waterstones if they’ve dished.
Annually
Complete sharpening of the entire tool kit. Regrind worn primary bevels. Flatten stone backs. Clean and organize sharpening supplies.
Building Your Station
A dedicated sharpening area makes maintenance convenient.
Locate near your bench for quick touch-ups. You’re more likely to sharpen if the station is steps away rather than across the shop.
Provide good light. You need to see the edge and bevel clearly. A magnifier helps for fine work and inspection.
Include storage for all supplies. Stones, jigs, strops, and compounds should have homes. Organization prevents searching when you need to sharpen.
Protect surfaces from water and oil. A dedicated bench or waterproof top prevents damage to other work surfaces.
The Investment
Sharp tools transform woodworking from labor to craft. The time spent learning to sharpen returns dividends on every subsequent project.
Start simple. A combination stone and strop handle most sharpening tasks. Add equipment as your skills and demands grow.
Practice regularly. Sharpening is a skill that develops with repetition. Each session builds muscle memory and judgment.
The edge you create connects you to centuries of woodworking tradition. Craftsmen have always kept their tools keen. Join that lineage by mastering this fundamental skill.


Stay in the loop
Get the latest crafted wood creations updates delivered to your inbox.