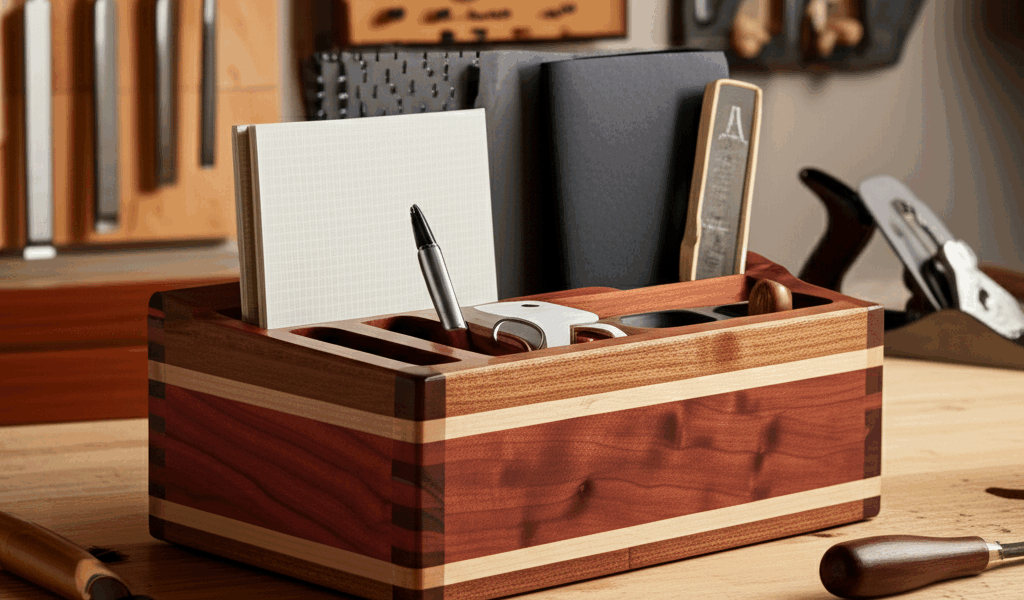
There’s something about a cherry and maple combination that just works. The warm reddish-brown of cherry against the creamy pale of maple creates contrast without conflict. When I needed a desktop organizer that could hold its own among nice furniture, this was the obvious pairing. The result looks like something from a high-end stationery store – but it’s made from offcuts and cost almost nothing.
Why These Two Woods
Cherry and maple share similar working properties – they machine cleanly, sand without fuss, and take finish beautifully. But visually, they’re complete opposites. Cherry starts pink and ages to a deep reddish-brown; maple stays pale and develops a subtle golden glow over time. Together, they create that “intentionally designed” look that single-species projects can’t match.
Both woods are stable and hard enough for something that’ll see daily handling. Softer woods dent too easily in a desk accessory. These will develop patina rather than damage.
The Design: Modular Cubbies
Rather than one fixed organizer, I build a set of matching compartments that can be arranged as needed. The core unit is a simple rectangular box – cherry sides with a maple bottom. Make three or four of these in graduating sizes, and you’ve got a customizable system that adapts to what you actually keep on your desk.
Standard dimensions that work well:
Pen cup: 3″ x 3″ footprint, 4″ tall
Card holder: 4″ x 3″ footprint, 2″ tall
Larger catchall: 5″ x 4″ footprint, 3″ tall
Note paper holder: 4″ x 4″ footprint, 2″ tall
Construction Method: Box Joints
Simple butt joints would work, but they don’t show enough of the wood contrast. Box joints (also called finger joints) create that interlocking pattern at each corner where cherry and maple alternate. The joint itself becomes a design element.
Cut box joints at the table saw using a simple jig – a backing board with a pin spaced one finger-width from the blade. Start with a cut at the edge, fit that slot over the pin, make the next cut, repeat. It sounds complicated in writing but becomes intuitive after two or three joints.
For these small boxes, 3/8″ fingers work well with 1/2″ thick stock. Smaller fingers look fussy; larger ones reduce the visual impact of the alternating pattern.
Preparing the Stock
Mill both species to exactly the same thickness – 1/2″ is my go-to. Any variation shows up as misaligned fingers at the corners. Use a planer with a fine cut for final dimensioning, or hand plane if you’re building character.
Grain orientation matters for appearance. Position pieces so the grain runs around the box continuously – each side’s grain should flow into the adjacent side at the corners. This takes thought during layout but rewards you with a finished piece that looks designed rather than assembled.
Assembly
Dry-fit everything before glue touches wood. Box joints should slip together with moderate hand pressure. Too tight and you risk splitting; too loose and gaps appear.
For glue-up, apply sparingly to both halves of each joint. These boxes are small enough to clamp with rubber bands or painters tape while the glue sets. Work fast – you’re dealing with sixteen joint faces on a four-sided box, and you need everything aligned before any of them start setting.
The bottom panel slips into a shallow rabbet cut around the inside bottom edge of the box. Glue it in place or leave it floating – your choice. Floating is more technically correct for solid wood (allows expansion), but at these small dimensions it rarely matters.
Finishing for Maximum Contrast
A clear finish works, but you can really make the woods pop with a shellac sealer followed by paste wax. Shellac brings out cherry’s warmth and maple’s subtle figure. Wax adds a soft sheen without the plastic look of heavy varnish.
Apply shellac with a brush or spray can, two coats, light sand between. Let it cure overnight. Then buff in paste wax, let it haze, and buff again. The result is a tactile, natural feel that invites handling.
Avoid anything that yellows over time – this rules out most oil-based polyurethanes. Cherry will darken naturally with light exposure; you don’t need finish adding yellow to the maple side of the equation.
Arranging on Your Desk
The beauty of the modular approach is rearrangement. Cluster all four boxes together for a unified statement piece. String them in a line across the back of your desk. Use only one or two and stash the rest in a drawer. The system adapts to your work style and desktop real estate.
If you want a unified base, add a maple tray underneath everything – just a flat rectangle with a slight raised edge. This keeps the boxes from migrating during use and adds another layer of visual interest.
Total project time: about four hours for a four-box set. Material cost: minimal if you’re using offcuts, maybe $20 if buying fresh stock. What you end up with is a desk accessory that looks genuinely expensive and gets compliments from anyone who notices. That’s the power of contrasting woods done right.


Stay in the loop
Get the latest crafted wood creations updates delivered to your inbox.