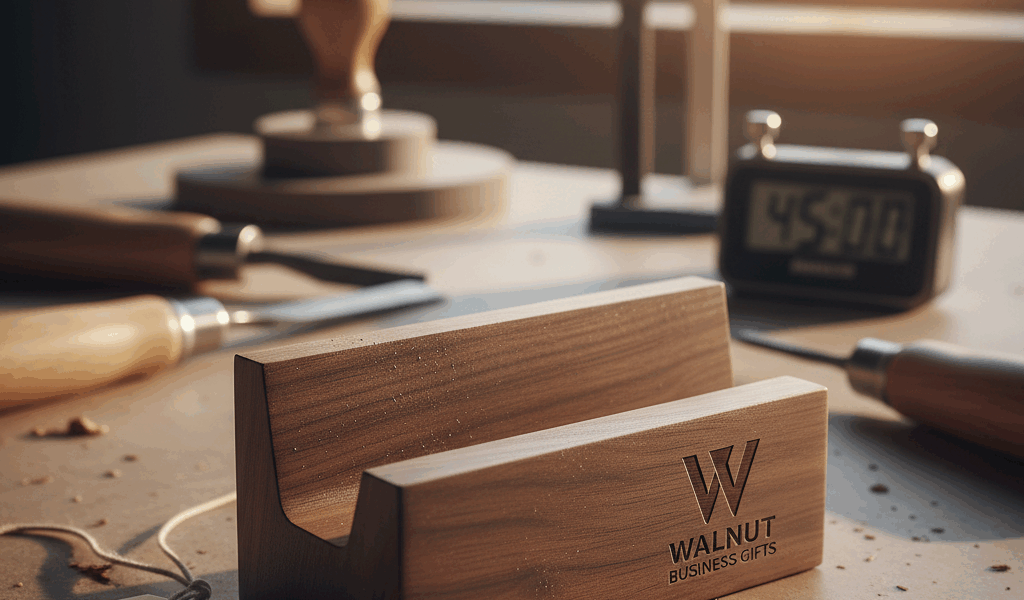
The walnut business card holder is my go-to project when I need a high-impact gift in minimal time. Forty-five minutes from raw board to finished piece, and the result sits on someone’s desk for years, quietly broadcasting quality every time a visitor picks up a card. There’s no better return on time invested in the gift-making department.
Why Walnut Works Best
Walnut has that executive quality that maple and pine simply don’t convey. The deep chocolate brown with purple undertones reads as “expensive” to almost everyone. It machines cleanly, finishes beautifully, and develops character as it ages. For a piece that sits on a desk and represents someone’s professional identity, walnut is the obvious choice.
That said, cherry works nearly as well if you can’t source walnut. Avoid light-colored woods for this project – they show desk dust and hand oils too readily.
Dimensions That Work
A standard business card is 3.5″ x 2″. Your holder needs to accommodate that with room for fingers to extract cards easily. The sweet spot is an interior slot about 3.75″ x 2.25″ – just enough clearance without the cards swimming around.
Overall dimensions: 4.5″ long x 2.75″ wide x 1.25″ tall. These proportions look right on a desk and provide enough mass that the holder doesn’t slide around or tip over.
Two Construction Methods
Method one is subtractive: start with a solid block and cut a slot into it. This is faster but requires a router or dado stack.
Method two is additive: build a three-piece sandwich with a hollow center. This takes slightly longer but requires only basic tools.
Both approaches produce the same end result. Choose based on your shop setup.
The Subtractive Method
Mill a piece of walnut to 4.5″ x 2.75″ x 1.25″. Mark the slot position centered on the top face, about 0.375″ from each end and 0.25″ from each side. Set your router with a 3/4″ straight bit and rout to a depth of about 0.875″. Multiple passes are safer than trying to take the full depth at once.
Clean up the slot with a chisel, squaring the corners and smoothing the bottom. The interior doesn’t have to be perfect – it’s mostly hidden by cards – but visible edges where the slot meets the surface should be crisp.
The Additive Method
Cut three pieces: a base (4.5″ x 2.75″ x 0.375″), a middle frame (4.5″ x 2.75″ x 0.5″ with a centered rectangular cutout), and a top frame (same as middle but only 0.375″ thick). Glue them together as a stack.
The cutout in the middle and top pieces forms the card slot. Cut these on the bandsaw or scroll saw before assembly. Make the middle layer’s cutout slightly smaller than the top layer’s – this creates a subtle reveal that adds visual depth.
Edge Treatment
The top edges of the slot should be eased slightly – a small chamfer or roundover prevents cards from catching. Use a small hand plane, a block with sandpaper, or a router with a 1/8″ roundover bit.
The exterior edges can go multiple directions. A slight chamfer on all edges is the conservative choice. A more aggressive roundover softens the look. For maximum executive presence, leave edges sharp and crisp – this takes careful sanding to maintain clean lines.
Finishing for the Office
The finish needs to be professional-looking and durable. Shellac sealed with wax is my favorite for walnut – it brings out the grain without adding any plastic sheen. Two thin coats of shellac, light sanding with 400-grit between, then paste wax buffed to a soft glow.
Oil finishes work but take longer to cure fully. If you’re making this as a gift for tonight’s dinner party, stick with shellac and wax – you can handle the piece within an hour of finishing.
Personalization
This is where you elevate “nice gift” to “memorable gift.” Laser engraving a name, initials, or company logo on the front face takes the holder from generic to personal. Hand-cutting a small inlay of contrasting wood – a thin maple stripe, say – achieves the same effect with more traditional methods.
For executives, consider adding a subtle detail that references their industry or interests. A small inlaid compass rose for someone in travel. A thin copper strip for someone in technology. A wood-burned book motif for a bibliophile. These touches show thought beyond just “I made a thing.”
The 45-Minute Timeline
Here’s how the time breaks down for the subtractive method:
Milling the block: 5 minutes (assuming you start with rough lumber near final size)
Routing the slot: 10 minutes
Chiseling and cleanup: 5 minutes
Sanding through grits: 10 minutes
Applying shellac (two coats with dry time): 15 minutes total active time, works out perfectly if you sand between coats
Wax application and buffing: 5 minutes
Add another 15 to 20 minutes for personalization, but the basic holder is complete in under an hour. For something that looks like a $60 desk accessory and carries genuine handmade authenticity, that’s an unbeatable time investment.


Stay in the loop
Get the latest crafted wood creations updates delivered to your inbox.