Why Bandsaws Drift and What You’re Actually Dealing With
Bandsaw drift has gotten complicated with all the conflicting advice flying around. Forums say tension. YouTube says guides. Your buddy at the shop says just angle the fence and move on. I spent about four months chasing this problem myself before I learned to actually diagnose it — and the difference between diagnosing and guessing is the difference between a ten-minute fix and a ruined Saturday afternoon.
But what is drift, exactly? In essence, it’s your blade refusing to cut in a straight line. But it’s much more than that. Straight-cut failure comes in two distinct flavors, and they point to completely different problems. The first is consistent drift — your blade pulls hard left or right throughout the entire cut, every single time. That’s mechanical. The second is wandering or curving, where the blade starts tracking fine but gradually curves mid-cut or leaves a bowed kerf. That one usually comes down to blade condition or load.
Probably should have opened with this section, honestly — before you dismantle anything, make a test cut on scrap about 12 inches long. Don’t fight the blade. Let it go wherever it wants. Watch whether it pulls hard from the first inch or whether it tracks okay initially and then curves. Half the people I talk to blame tension when the real culprit is sitting two inches lower on the machine.
One more thing worth separating out: blade lead angle gets confused with drift constantly, and they’re not the same thing. Lead angle is about feed direction — the natural angle at which your blade wants to cut relative to the fence. Drift is when you can’t run straight even feeding directly into the blade. Separate problems. Separate fixes. Keep that distinction in your head or you’ll be chasing ghosts.
Blade Tension and Tracking Are the First Things to Check
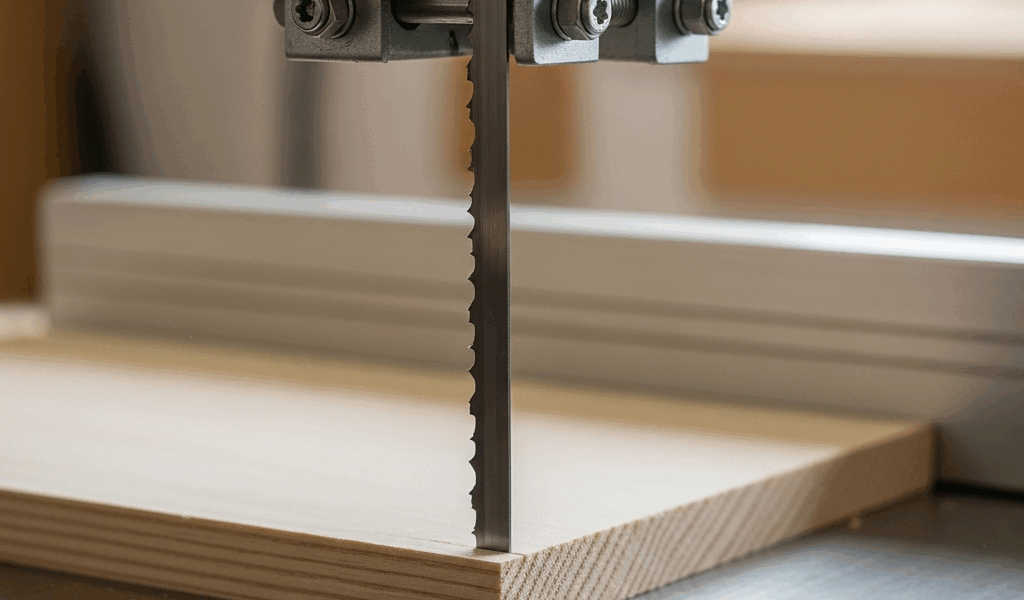
An under-tensioned blade is the single most common thing I find on machines that won’t cut straight. Under-tension means the blade deflects under side load — the sideways pressure from your workpiece pushing against the cutting edge. When that blade flexes, it bows the kerf and wanders left or right looking for the path of least resistance. That’s what makes this problem so frustrating to us woodworkers — it looks like an alignment issue when it’s really a tension issue.
Here’s how to test tension without a gauge you probably don’t own anyway. Find the longest exposed blade span between the upper and lower wheels — usually the front section. Press sideways on it with light finger pressure, roughly the force you’d use to test a guitar string. The blade should deflect maybe a quarter-inch at most. If you’re getting a half-inch or more of movement with casual pressure, tension is too low. Full stop.
The tension knob sits on the upper wheel housing. Turn it clockwise to increase. Go gradually — you want that sweet spot where light side pressure yields almost no movement. Too much tension eats wheels and bearings fast. Too little and you get exactly what you’re seeing. Don’t make my mistake of cranking it all the way up thinking more is always better. That was a $40 tire replacement I didn’t need.
Here’s the part most guides skip entirely: tension alone doesn’t matter if your blade isn’t tracking correctly on the tires. Tracking is the blade’s position on the wheel as it turns. A blade sitting too far forward on the tire handles side load completely differently than one riding too far back. Both can be under identical tension. One tracks true anyway. This distinction matters enormously.
Unplug the saw first. Spin the upper wheel by hand and watch the blade — it should sit centered on the tire, not creeping toward the front flange or drifting backward. The tracking adjustment is usually a knob that tilts the upper wheel slightly. Adjust it so the blade stays centered through a full rotation. This takes patience and half-turn increments. Also worth knowing: tension and tracking interact with each other, so after adjusting one, recheck the other.
Blade width matters too — more than most beginners expect. A 1/4-inch blade flexes dramatically more under side load than a 1/2-inch blade. I’m apparently stubborn about this and learned it the hard way trying to rip 8-inch maple strips with a quarter-inch Olson WB55293 blade, wondering why every single cut looked like it had been chewed by something angry. For rip work, go wider. A 1/2-inch blade resists drift in a way a 1/4-inch blade simply cannot.
Guide Alignment Above and Below the Table
The guides on a bandsaw are there to support the blade during a cut — not steer it. This distinction matters more than people realize. Guides prevent the blade from flexing forward and backward. They don’t control where the blade cuts sideways. That’s not their job. When people set guides to compensate for drift, they’re masking a problem that will get worse.
Start with the thrust bearing — the bearing sitting directly behind the blade at the top. The gap between that bearing and the blade should run roughly 0.004 to 0.010 inch. Too close and you’re preloading the bearing every single cut. Too far and the blade flexes backward under load and the cut wanders. Use a feeler gauge if you have one. Don’t have one? Standard business card stock runs about 0.010 inch — use it as a rough reference until you pick up a proper gauge set. A decent set runs maybe $8 at Harbor Freight.
Side guides — whether blocks or bearings — should be positioned so they’re just barely not touching the blade when it runs unloaded. We’re talking 0.005 to 0.015 inch on each side. The mistake I see constantly is guides set way too far out, leaving an eighth of an inch of clearance or more. That gap lets the blade flex sideways freely, which makes having guides completely pointless. Close them up. Just don’t clamp them against the blade.
Guide height is something people overlook. Lower guides should clear your workpiece height — not pressed against the table, but just above it. Too high above the work and they can’t support the blade where it actually needs support. Misaligned lower guides cause a specific and annoying problem: upward blade deflection. The cut ends up higher on one side than the other, or you get a convex crowned cut surface. Check that the lower guide block sits parallel to the table and square to the blade. Easier to do with the saw unplugged.
Blade Condition and Tooth Geometry
A dull blade and a blade with uneven set both cause drift — but in different ways. Knowing which one you’re dealing with tells you what’s actually wrong.
Uneven set pulls the cut consistently to one side. Set is the amount the teeth project from the blade body — it’s what creates a kerf wider than the blade thickness so the blade doesn’t bind. If the set is heavier on one side, that side cuts more aggressively and the blade drifts that direction. Check it by laying a straightedge flat against the tooth tips on each side. You want roughly equal projection on both sides. If one side clearly sticks out more, the blade is set unevenly. It will drift. Replace it.
A dull blade is a different animal — it wanders and requires heavy feed pressure to cut at all. Heavy pressure amplifies every existing alignment issue on the machine, so drift gets worse as the blade dulls. Dull blades also heat up faster, which can cause temporary tracking shift mid-cut. The fix is replacement, not resharpening. For standard 1/2-inch carbon-steel blades — Timberwolf, Olson, Highland Hardware all make decent ones running $8 to $15 each — replacement is just smarter than the hassle of sending blades out.
So, without further ado, here’s the quick read: if the curved cut gets worse as the blade ages, the blade is dull. If you’re seeing consistent one-direction drift that doesn’t change with a fresh blade, go back to tension, tracking, and guide alignment.
Using a Fence or Adjusting for Lead Angle
Lead angle is the direction the blade naturally wants to feed. Some blades have more of it than others depending on tooth geometry and set. A blade with natural lead angle will push your workpiece slightly off-angle to the fence during the cut. That’s what makes lead angle endearing to us woodworkers — once you understand it, you can work with it instead of fighting it.
To find your blade’s natural lead angle, make a freehand straight cut on scrap with no fence, just feeding straight into the blade. Mark where the blade exits the bottom of the piece. Set a sliding bevel to match that angle. That’s your lead. Some blades run 2 to 4 degrees, which is completely normal. Others barely show any lead at all — depends on the blade.
You can angle your fence to match that lead angle and feed straight. Or you can accept the lead and feed at a slight angle naturally. Either approach works fine. What doesn’t work is using the fence as a band-aid for a saw that isn’t tuned. If you’re seeing more than a few degrees of lead angle, your tracking or guides are off — not your technique. The fence isn’t a compensation tool. Don’t make my mistake of spending an hour shimming a fence when the real fix was a five-minute tracking adjustment.
While you won’t need a full machine shop’s worth of tools, you will need a handful of basics — feeler gauges, a reliable square, and a good straightedge — at least if you want to do this properly rather than by feel alone. Get the fundamentals right first: tension, tracking, guide alignment. Most bandsaws cut perfectly straight once those three things are dialed in. The fence is for accurate sizing. That’s its job. Let it do that job and nothing else.


Stay in the loop
Get the latest crafted wood creations updates delivered to your inbox.