
A complete finishing schedule from sanding to final coat requires proper timing and technique at each stage. Rushing steps or skipping preparation leads to poor results that require stripping and starting over. Here’s a realistic timeline for quality finishes.
Initial Sanding Phase
Start with the coarsest grit that removes mill marks and surface defects without creating unnecessary work—typically 80-120 grit depending on wood condition. This initial pass takes approximately 15-20 minutes per square foot of surface area, including setup and dust removal.
Progress through grits: 120 to 180 to 220 for hardwoods, continuing to 320 for softwoods. Each grit pass takes less time than the previous one since you’re removing finer scratches. Budget 40-60 minutes total sanding time per square foot for a complete progression.
Pre-Stain Preparation

After final sanding, remove all dust using compressed air, vacuum, and tack cloth. This dust removal is critical—any remaining dust will show in the finish as nibs and rough texture. Spend 10-15 minutes per project on thorough dust removal.
For woods prone to blotching (pine, cherry, birch), apply wood conditioner and wait 15-30 minutes per the product instructions. Wipe away excess and let dry for the recommended time before staining. This adds 30-60 minutes to your schedule.
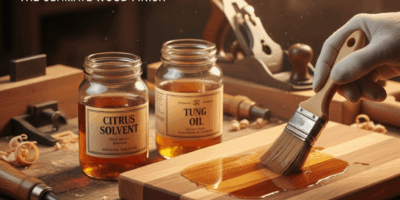
Staining Process
Apply stain with a brush or cloth, working manageable sections to maintain a wet edge. Let the stain penetrate 3-5 minutes for light color, 8-10 minutes for darker tones. Wipe away excess thoroughly—inadequate wiping leaves the surface tacky and prevents proper topcoat adhesion.
Allow stain to dry completely before topcoats—minimum 4-6 hours, preferably overnight. Oil-based stains need 8-12 hours. Applying topcoats over incompletely dried stain causes finish failure through poor adhesion and prolonged cure times.
Seal Coat Application
The first coat of finish seals the wood and raises remaining grain fibers. Apply a thin coat of your chosen finish—polyurethane, shellac, lacquer, or oil. Brush application takes 10-15 minutes for a typical table top. Wiping on finish takes 15-20 minutes due to the need to wipe away excess.
Let the seal coat dry completely: 2-4 hours for water-based finishes, 4-8 hours for oil-based polyurethane, 2-3 hours for shellac. Temperature and humidity affect drying times—add time in cold or humid conditions.
Sanding the Seal Coat
Once the seal coat is dry, sand lightly with 320-grit paper to remove raised grain and any dust nibs. This sanding should barely cut the finish—you’re smoothing, not removing material. The surface should feel smooth to the touch without visible sheen remaining.
Remove sanding dust thoroughly with tack cloth. This step takes 15-20 minutes including dust removal. Skipping this sanding leaves a rough texture in the final finish.
Build Coats
Apply 2-3 additional coats of finish, sanding between each coat with 320 or 400-grit paper. Each coat requires the same dry time as the seal coat. Total finishing time breaks down as follows:
- Coat 1 (seal coat): apply 15 minutes, dry 4-8 hours, sand 20 minutes
- Coat 2: apply 15 minutes, dry 4-8 hours, sand 15 minutes
- Coat 3: apply 15 minutes, dry 4-8 hours (no sanding on final coat)
Total elapsed time: 15-24 hours plus application and sanding time of approximately 2 hours.
Final Coat Considerations
The final coat receives extra attention during application since you won’t be sanding it. Work in a dust-free environment and strain the finish to remove any particles. Apply thin, even coats—thick final coats may sag or run.
Don’t sand the final coat unless absolutely necessary to fix defects. If sanding is required, use 600-grit paper or finer and follow with rubbing compound to restore sheen.
Cure Time Before Use
Finishes that are dry to the touch aren’t fully cured. Full cure times vary:
- Oil-based polyurethane: 7-14 days for full cure
- Water-based polyurethane: 14-21 days for full cure
- Lacquer: 24-48 hours for full cure
- Shellac: 3-5 days for full cure
- Oil finishes: 15-30 days for full cure
During cure time, avoid placing objects on the surface, especially items that might stick or mark the finish. Use the piece carefully until the finish has fully hardened.
Environmental Conditions
All these times assume room temperature (70°F) and moderate humidity (40-50%). Cold temperatures increase drying and cure times significantly. Below 55°F, some finishes don’t cure properly at all.
High humidity (above 70%) extends drying times by 50-100%. Water-based finishes are particularly sensitive to humidity. In very humid conditions, consider using a dehumidifier in your finishing area or waiting for better weather.
Realistic Schedule Example
For a typical dining table using oil-based polyurethane:
Day 1 (4 hours): Complete sanding progression, dust removal, apply stain
Day 2 (1 hour): Apply seal coat
Day 3 (1 hour): Sand seal coat, apply second coat
Day 4 (1 hour): Sand second coat, apply third coat
Day 5-11: Cure time before use
Total active work: 7 hours spread over 4 days, plus 7-day cure. Attempting to compress this schedule risks finish failures requiring complete stripping and refinishing.
Fast-Drying Options
Shellac and lacquer dry much faster than polyurethane. A complete shellac finish can be applied in a single day: seal coat in the morning, sand at midday, second coat early afternoon, sand late afternoon, final coat evening. The finish is usable (though not fully cured) the next day.
This speed comes with trade-offs: shellac isn’t water-resistant, and lacquer requires spray equipment for best results. For projects where you need fast turnaround and the finish characteristics suit your needs, these faster-drying finishes save substantial time.
Production Shortcuts
Professional shops use spray equipment and fast-drying finishes to reduce finishing time. They may also have finishing rooms with controlled temperature and humidity for consistent drying times. These shortcuts aren’t available to most home woodworkers.
Don’t try to match production shop timelines using brush-applied finishes and uncontrolled shop conditions. Follow the realistic schedules outlined above for reliable results. The extra days spent waiting for proper drying pay off in finish quality and durability.
Recommended Woodworking Tools
HURRICANE 4-Piece Wood Chisel Set – $13.99
CR-V steel beveled edge blades for precision carving.
GREBSTK 4-Piece Wood Chisel Set – $13.98
Sharp bevel edge bench chisels for woodworking.
As an Amazon Associate, we earn from qualifying purchases.


Stay in the loop
Get the latest crafted wood creations updates delivered to your inbox.