Mid-century design never really went out of style – it just got expensive. Walk into any furniture store and anything with tapered legs and clean lines carries a premium. But the magazine rack that inspired this project was in a Danish furniture catalog from 1962, and it’s dead simple to build. The tapered legs are the whole trick, and once you learn to cut them, a world of mid-century projects opens up.
Understanding the Aesthetic
The Danish modern look depends on a few key principles: function first, no ornamentation, light visual weight despite solid construction, and those distinctive tapered legs. The legs aren’t just stylistic – they lift the piece visually, create a sense of movement, and make sturdy furniture appear to float.
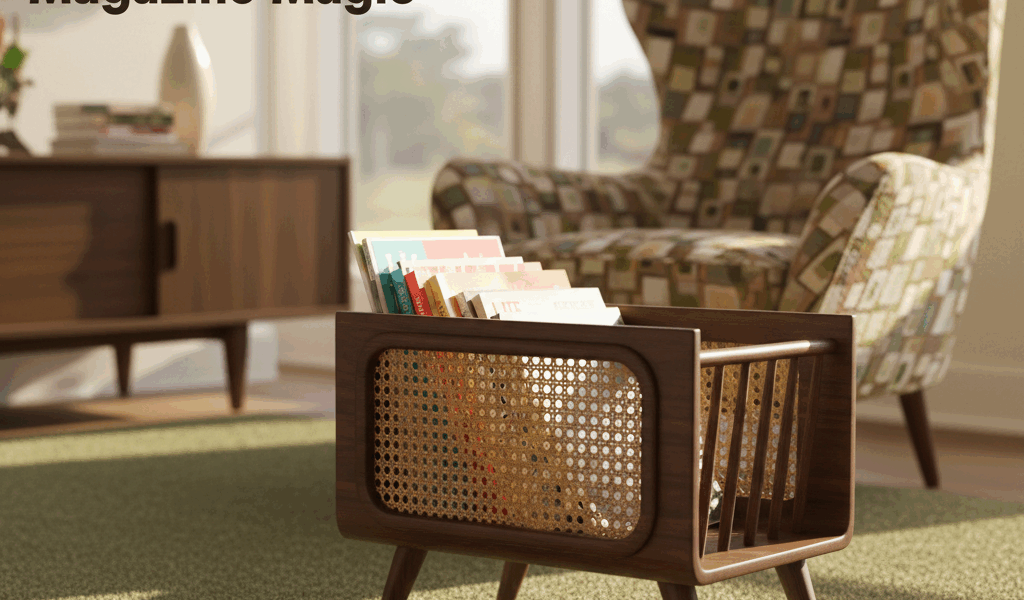
For a magazine rack, this translates to a simple rectangular bin shape lifted on four legs that angle outward slightly and taper from thick at the top to thin at the foot. That’s the whole design.
Dimensions That Work
A magazine is roughly 8″ x 11″, so the interior dimensions of the bin should be at least 10″ x 14″ – a bit of extra room makes extracting magazines easier. Height from floor to rim runs about 18″ to 20″. Leg length (from floor to where they meet the bin) is about 14″.
The bin itself is shallow – maybe 6″ deep. This isn’t meant to hold a year’s worth of National Geographic; it’s for the current issue and a few recent ones.
Wood Selection
Teak was the wood of choice in 1960s Denmark, but teak has become expensive and environmentally complicated. White oak is an excellent substitute – similar grain character, good workability, and that warm honey color when finished with oil. Walnut works beautifully too, though it’s a departure from the traditional light tones.
For the legs, use 8/4 (2″ thick) stock to allow for the taper. The bin panels can be 3/4″ stock or even 1/2″ if you want a lighter look.
Cutting the Tapered Legs
Each leg starts as a blank about 2″ x 2″ x 14″. The taper runs on two inside faces, leaving the outside corner square. At the top (where the leg meets the bin), the leg is the full 2″ x 2″. At the floor, it tapers to about 3/4″ x 3/4″.
The safest way to cut these tapers is with a tapering jig on the table saw. Build a simple sled that holds the blank at an angle – the angle determines your taper ratio. Set the jig, cut two adjacent faces, and you’ve got a leg.
An alternative for those without a table saw: mark the taper lines on the blank and remove material with a hand plane or bandsaw, then clean up with a plane. It’s slower but entirely achievable.
Leg Attachment and Splay
Here’s where the design gets its character. The legs don’t attach straight up and down – they splay outward at about 5 to 8 degrees. This creates that distinctive mid-century stance.
For joinery, compound-angle mortises are the traditional approach. Cut a mortise into the bottom of the bin, angled to match the splay. Shape a matching tenon on the leg. This is fussy work but creates an incredibly strong joint.
A simpler approach: attach metal mounting plates to the legs, then screw the plates to the bin bottom. Less traditional, but the hardware is hidden beneath the bin and the look is identical.
Building the Bin
The bin is a simple rectangular box with mitered corners. Cut four panels: two at 14″ x 6″ (long sides) and two at 10″ x 6″ (short sides). Miter the ends at 45 degrees. Glue and clamp, reinforcing with splines if desired.
The bottom is a piece of 1/4″ plywood rabbeted into the bin walls, or omit the bottom entirely – a slatted base looks more authentic to the period anyway.
For a slatted base, run three or four strips of 1/4″ x 1″ stock across the short dimension, spaced about 2″ apart. They drop into shallow dadoes cut into the long sides.
Finishing for Authenticity
Danish modern furniture was typically finished with oil, not film finishes like polyurethane. Tung oil or Danish oil (appropriately enough) creates that classic low-sheen, tactile surface. Apply three or four coats, sanding lightly between with 400-grit.
If you need more protection, a wipe-on polyurethane in satin or semi-gloss comes close to the look while offering better resistance to water and wear.
The Details That Matter
Ease every edge slightly. Mid-century pieces have a softness despite their geometric shapes. A small roundover or light sanding on every sharp corner achieves this.
The top edge of the bin can get a slightly more aggressive treatment – a 1/8″ roundover or a small chamfer defines the rim and makes handling more comfortable.
Consider adding a dowel or leather strap across the top as a handle. This is functionally useful (for moving the loaded rack) and visually authentic to the period.
Total Investment
Build time runs about five to six hours, with most of that going to the tapered legs and compound-angle joinery. Materials cost $40 to $60 depending on species. Comparable vintage magazine racks, when you can find them, sell for $200 to $400 in decent condition.
More importantly, you now know how to cut tapered legs. That skill translates directly to tables, chairs, benches, and plant stands. The 1960s Danish catalog is suddenly full of projects you can build.


Stay in the loop
Get the latest crafted wood creations updates delivered to your inbox.